How to build ML models with fastai and Jupyter in Hopsworks
This tutorial gives an overview of how to work with Jupyter on the platform and train a state-of-the-art ML model using the fastai python library.

Introduction
Jupyter provides an integrated development environment (IDE) allowing users to seamlessly mix code with visualization and comments, making it not just handy for prototyping, but also for visualization and educational purposes. In recent years, it has become a favourite tool employed by the many, used for data wrangling, data mining, statistical modeling, visualization, machine learning and the notebooks themselves scheduled to run in production at tech leaders such as Netflix.
The Hopsworks platform ships with Jupyter as one of the integrated components. Having already been pre installed and configured to work with Spark and PySpark kernels, in addition to the Python kernel, getting started with writing your notebooks and scheduling them in production on a Hopsworks cluster is straightforward. The Hopsworks installation also includes a Miniconda environment with the most popular libraries you can find in a data scientists toolkit, such as TensorFlow, PyTorch and scikit-learn.
In this tutorial we will describe how to work with a Jupyter notebook in the Hopsworks platform. As an example, we will demonstrate how to install fastai, a library that provides high-level components for building and training ML models to get state-of-the-art deep learning results, clone a set of notebooks from a git repository and train a model on a P100 GPU.
Prerequisites
To follow this tutorial you should have a Hopsworks instance running on Hopsworks. You can register for free, without providing credit card information, and receive USD 300 worth of free credits to get started. The only thing you need to do is to connect your cloud account.
The tutorial requires that you have configured the Hopsworks cluster with AKS or EKS depending on your cloud provider, and that the Kubernetes nodes are equipped with GPUs.
Step 1: Install fastai in the Python service
The first step in the tutorial is to install the fastai library. To get started, navigate to the Python service to install the fastai library from PyPi as shown in the example below. There are many different approaches to installing the library but in this instance we install the latest version of the fastai and nbdev package from PyPi, required to run the first notebook in the fastai course.
Step 2: Configuring and starting Jupyter
In the Jupyter service page there are three different modes that can be configured.
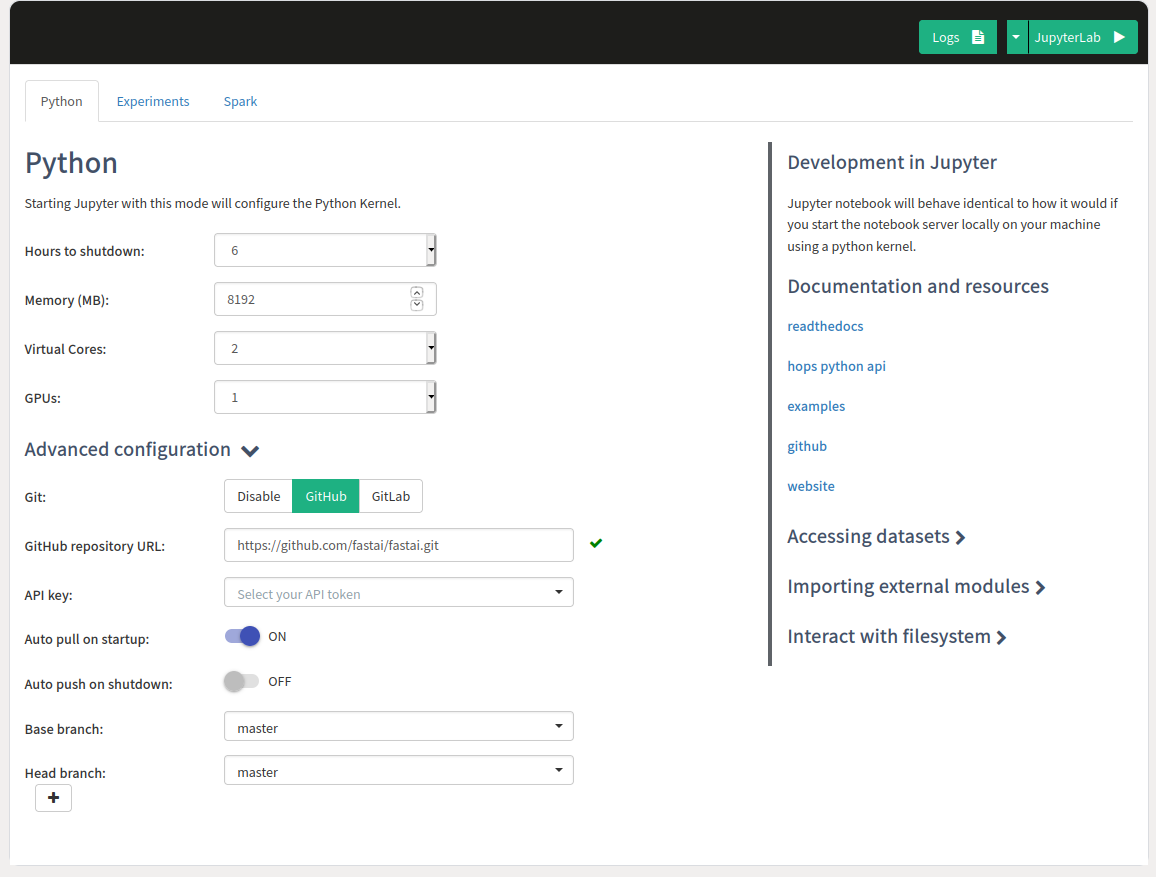
Firstly, there is a Python tab, in which configuration for the Python kernel, such as Memory/Cores/GPUs is set and optionally a git repository can also be configured that should be cloned when Jupyter starts up. This is the kernel that we are going to use in this tutorial.
Secondly, in the Experiments tab the PySpark kernel is configured. If you want to enable all the features in the plattform regarding, experiment tracking, hyperparameter optimization, distributed training. See HopsML for more information on the Machine Learning pipeline.
Thirdly, for general purpose notebooks, select the Spark tab and run with Static or Dynamic Spark Executors on Spark or PySpark.
The image below shows the configuration options set for the Python kernel. As working with larger ML models can be memory intensive make sure you are configuring the Memory for the kernel to be at least 8GB, then set GPUs to 1 to allocate a GPU that should be accessible for the kernel and set the git configuration to clone the fastai git repository to get access to the notebooks.
Step 3: Start the Notebook Server
Once the configuration has been entered for the Python kernel, press the button on the top that says JupyterLab to start the Notebook Server. Keep in mind that it may take some time as resources need to be allocated for the Notebook Server and to clone the git repository. The image below demonstrates the process of starting Jupyter.
Step 4: Inspecting the GPU
The Jupyter Notebook Server will now have been allocated a GPU which you can use in the Python kernel. To check the type and specifications of the GPU, open a new terminal inside Jupyter and run nvidia-smi. We can see that in this instance we have access to a P100 NVIDIA GPU.

Step 5: Start using fastai by following the course material
Now you’re all set to start following the course material that fastai provides. To make sure the GPU is being utilized you can leave a terminal window open and run nvidia-smi -l 1, which will print out the GPU utilization every second while you are running the training in the notebook.
In the example below, the first notebook lesson1-pets.ipynb in the fastai course is executed.
Get started
Hopsworks is available both on AWS and Azure as a managed platform. Register now and try it for free.