No items found.
arrow back
Back to Blog
Ahmad Al-Shishtawy
link to linkedin
Guest Blogger
Article updated on

Using an External Python Kafka Client to Interact with a Hopsworks Cluster

September 27, 2021
18 min
Read
Ahmad Al-Shishtawy
Ahmad Al-Shishtawylink to linkedin
Guest Blogger

TL;DR

In this blog you will learn how to publish (write) and subscribe to (read) streams of events and how to interact with the schema registry and use Avro for data serialization.

This tutorial was tested using Hopsworks version 2.2.

Prepare the Environment

We’ll start by preparing the schema, creating a Kafka topic, and downloading security credentials that we’ll need in this tutorial.

Avro Schema

Kafka treats data as blobs of bytes. It is your responsibility to pick a data format per topic and use it consistently across applications interacting with the topic. You are free to choose any format you prefer such as JSON or Protobuf. However, Avro became the industry standard for data format to use with Kafka. Avro is an open source data serialization system that is used to exchange data between systems across programming languages.

Avro relies on schemas that are used when writing/reading data. To simplify the management of schemas, Confluent implemented a Schema Registry as a layer on top of Kafka. Hopsworks implements its own schema registry that is compatible with Confluent Schema Registry v5.3.1. Kafka clients can use the schema registry to validate and make sure that the correct data is written to or read from a kafka topic.

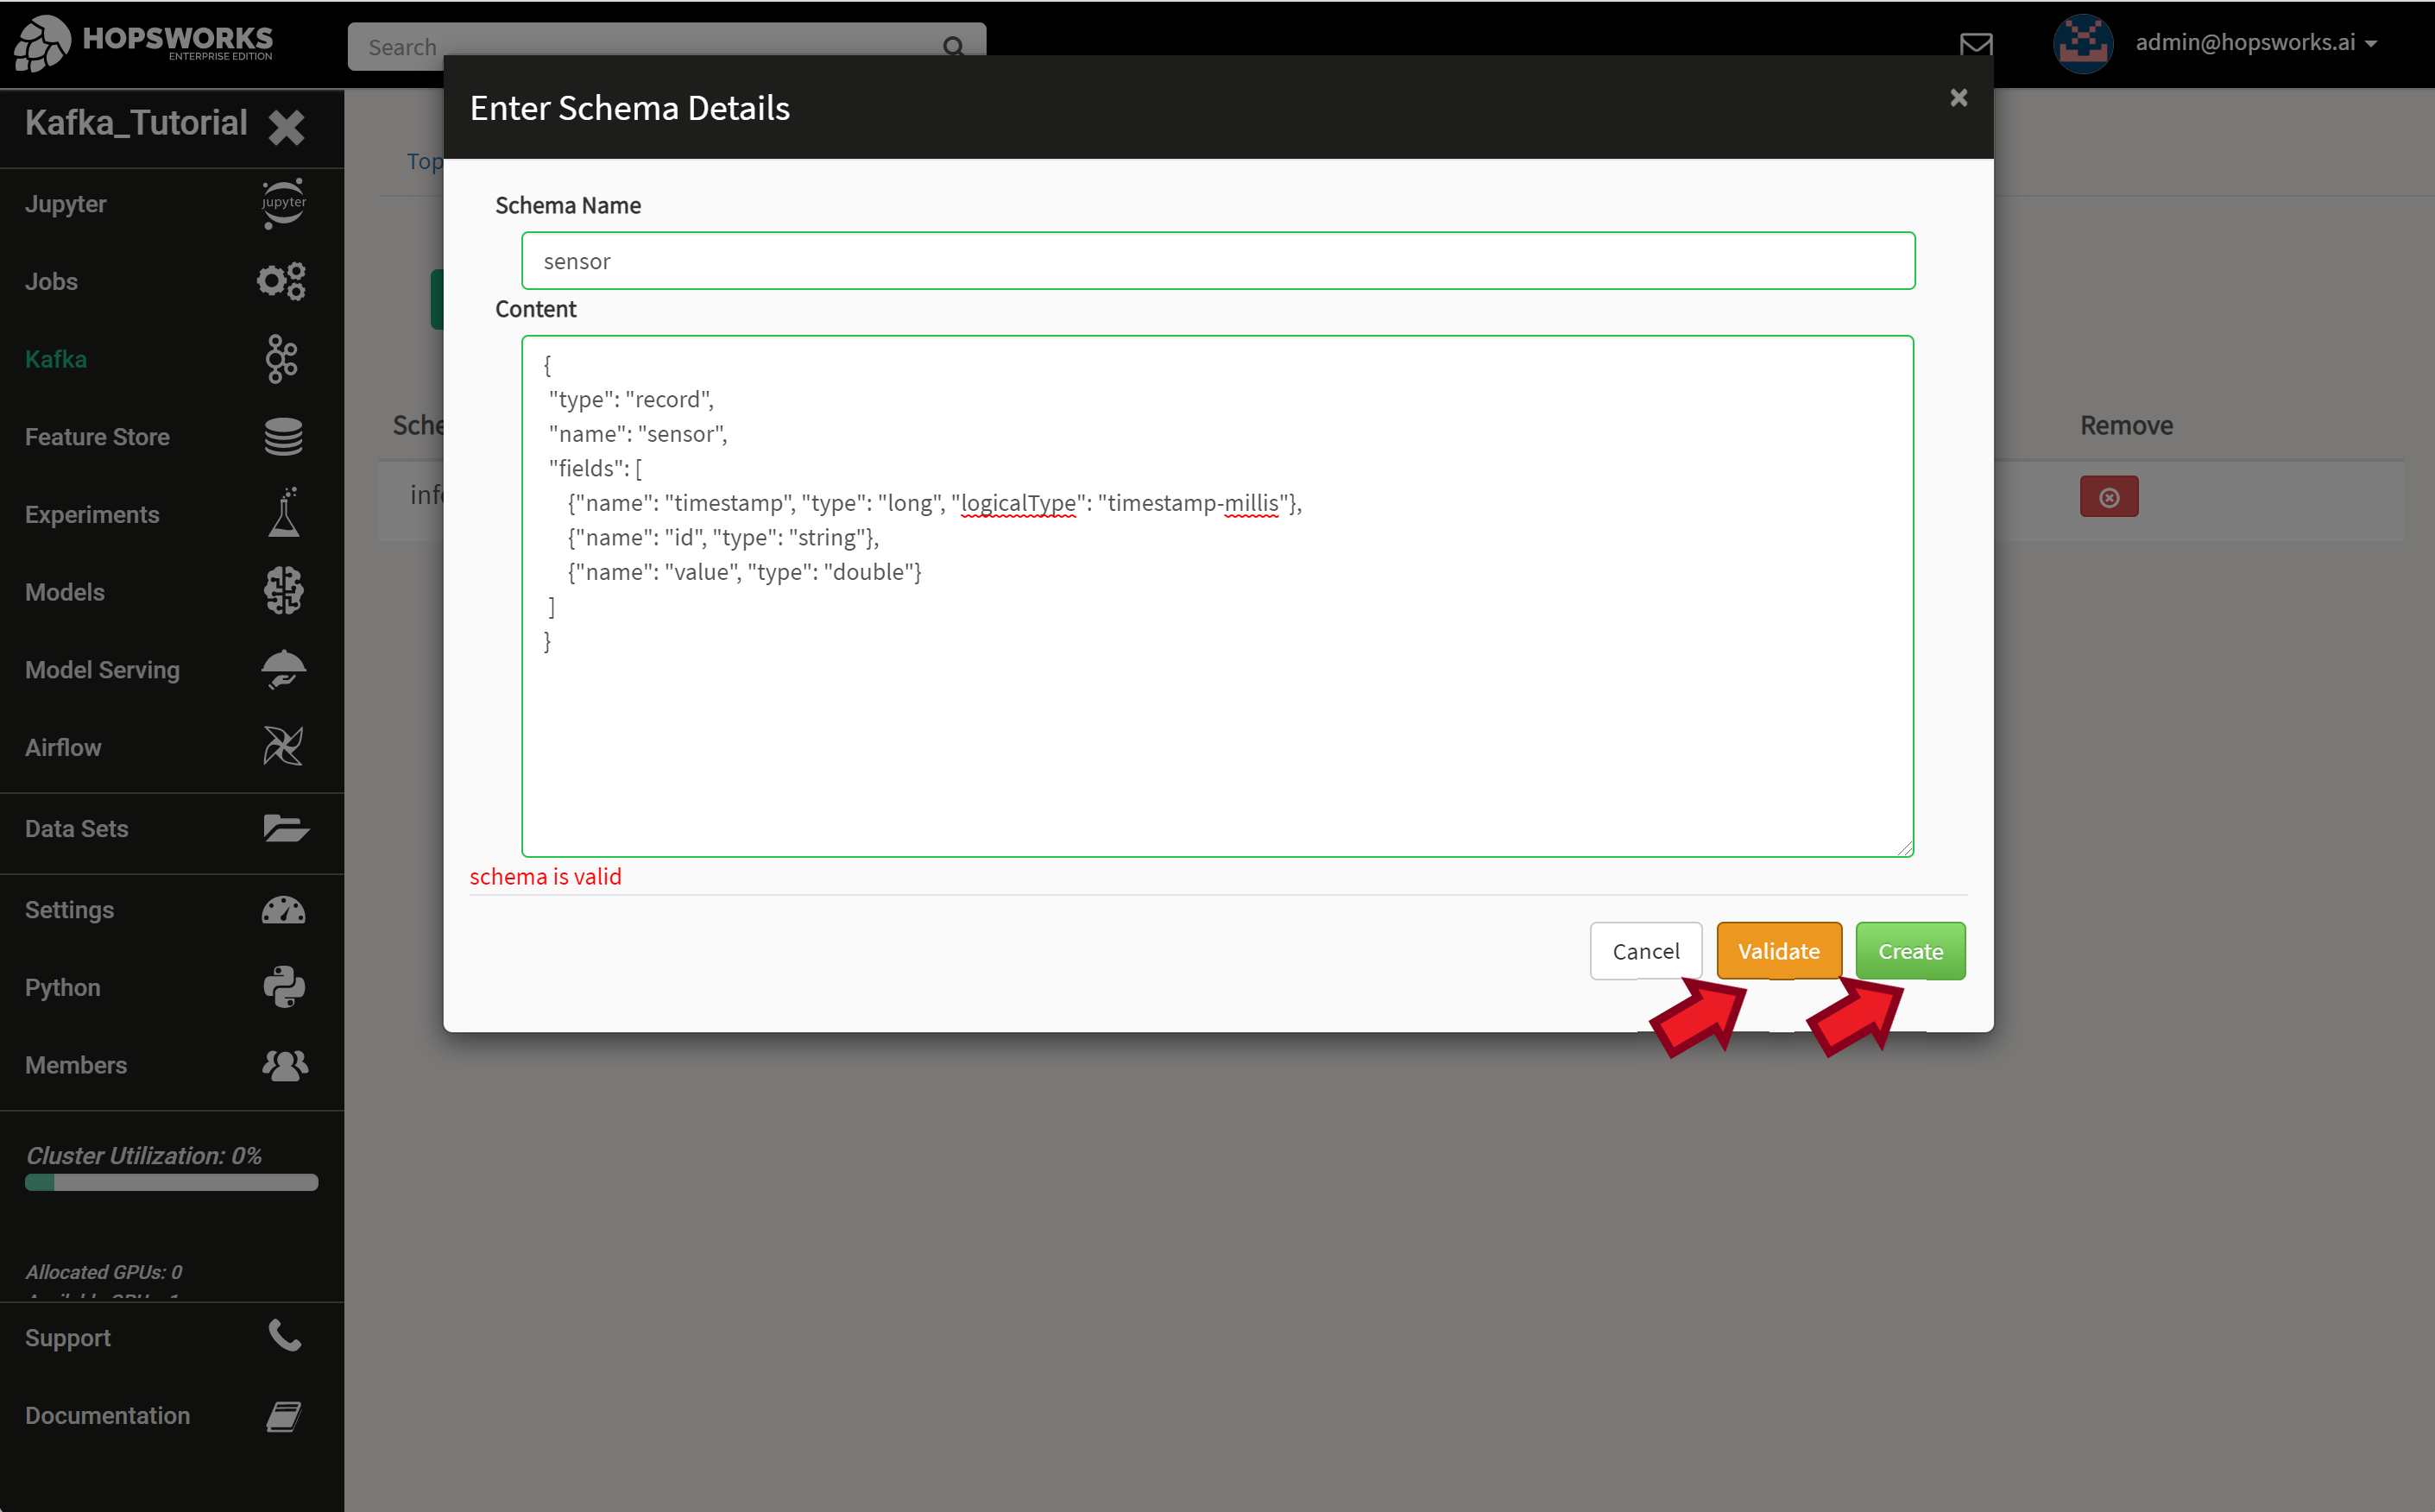
In this tutorial, we’ll use temperature sensors as an example. Each sensor will have a unique ID, produce a temperature as its value at a specific timestamp. We’ll create a generic sensor schema that can be used with sensors with similar pattern. The code blow list the schema used in this tutorial. For more details about declaring Avro schemas and supported data types, check the Avro schemas documentation.

{
  "type": "record",
  "name": "sensor",
  "fields": [
    {
      "name": "timestamp",
      "type": "long",
      "logicalType": "timestamp-millis"
    },
    {
      "name": "id",
      "type": "string"
    },
    {
      "name": "value",
      "type": "double"
    }
  ]
}

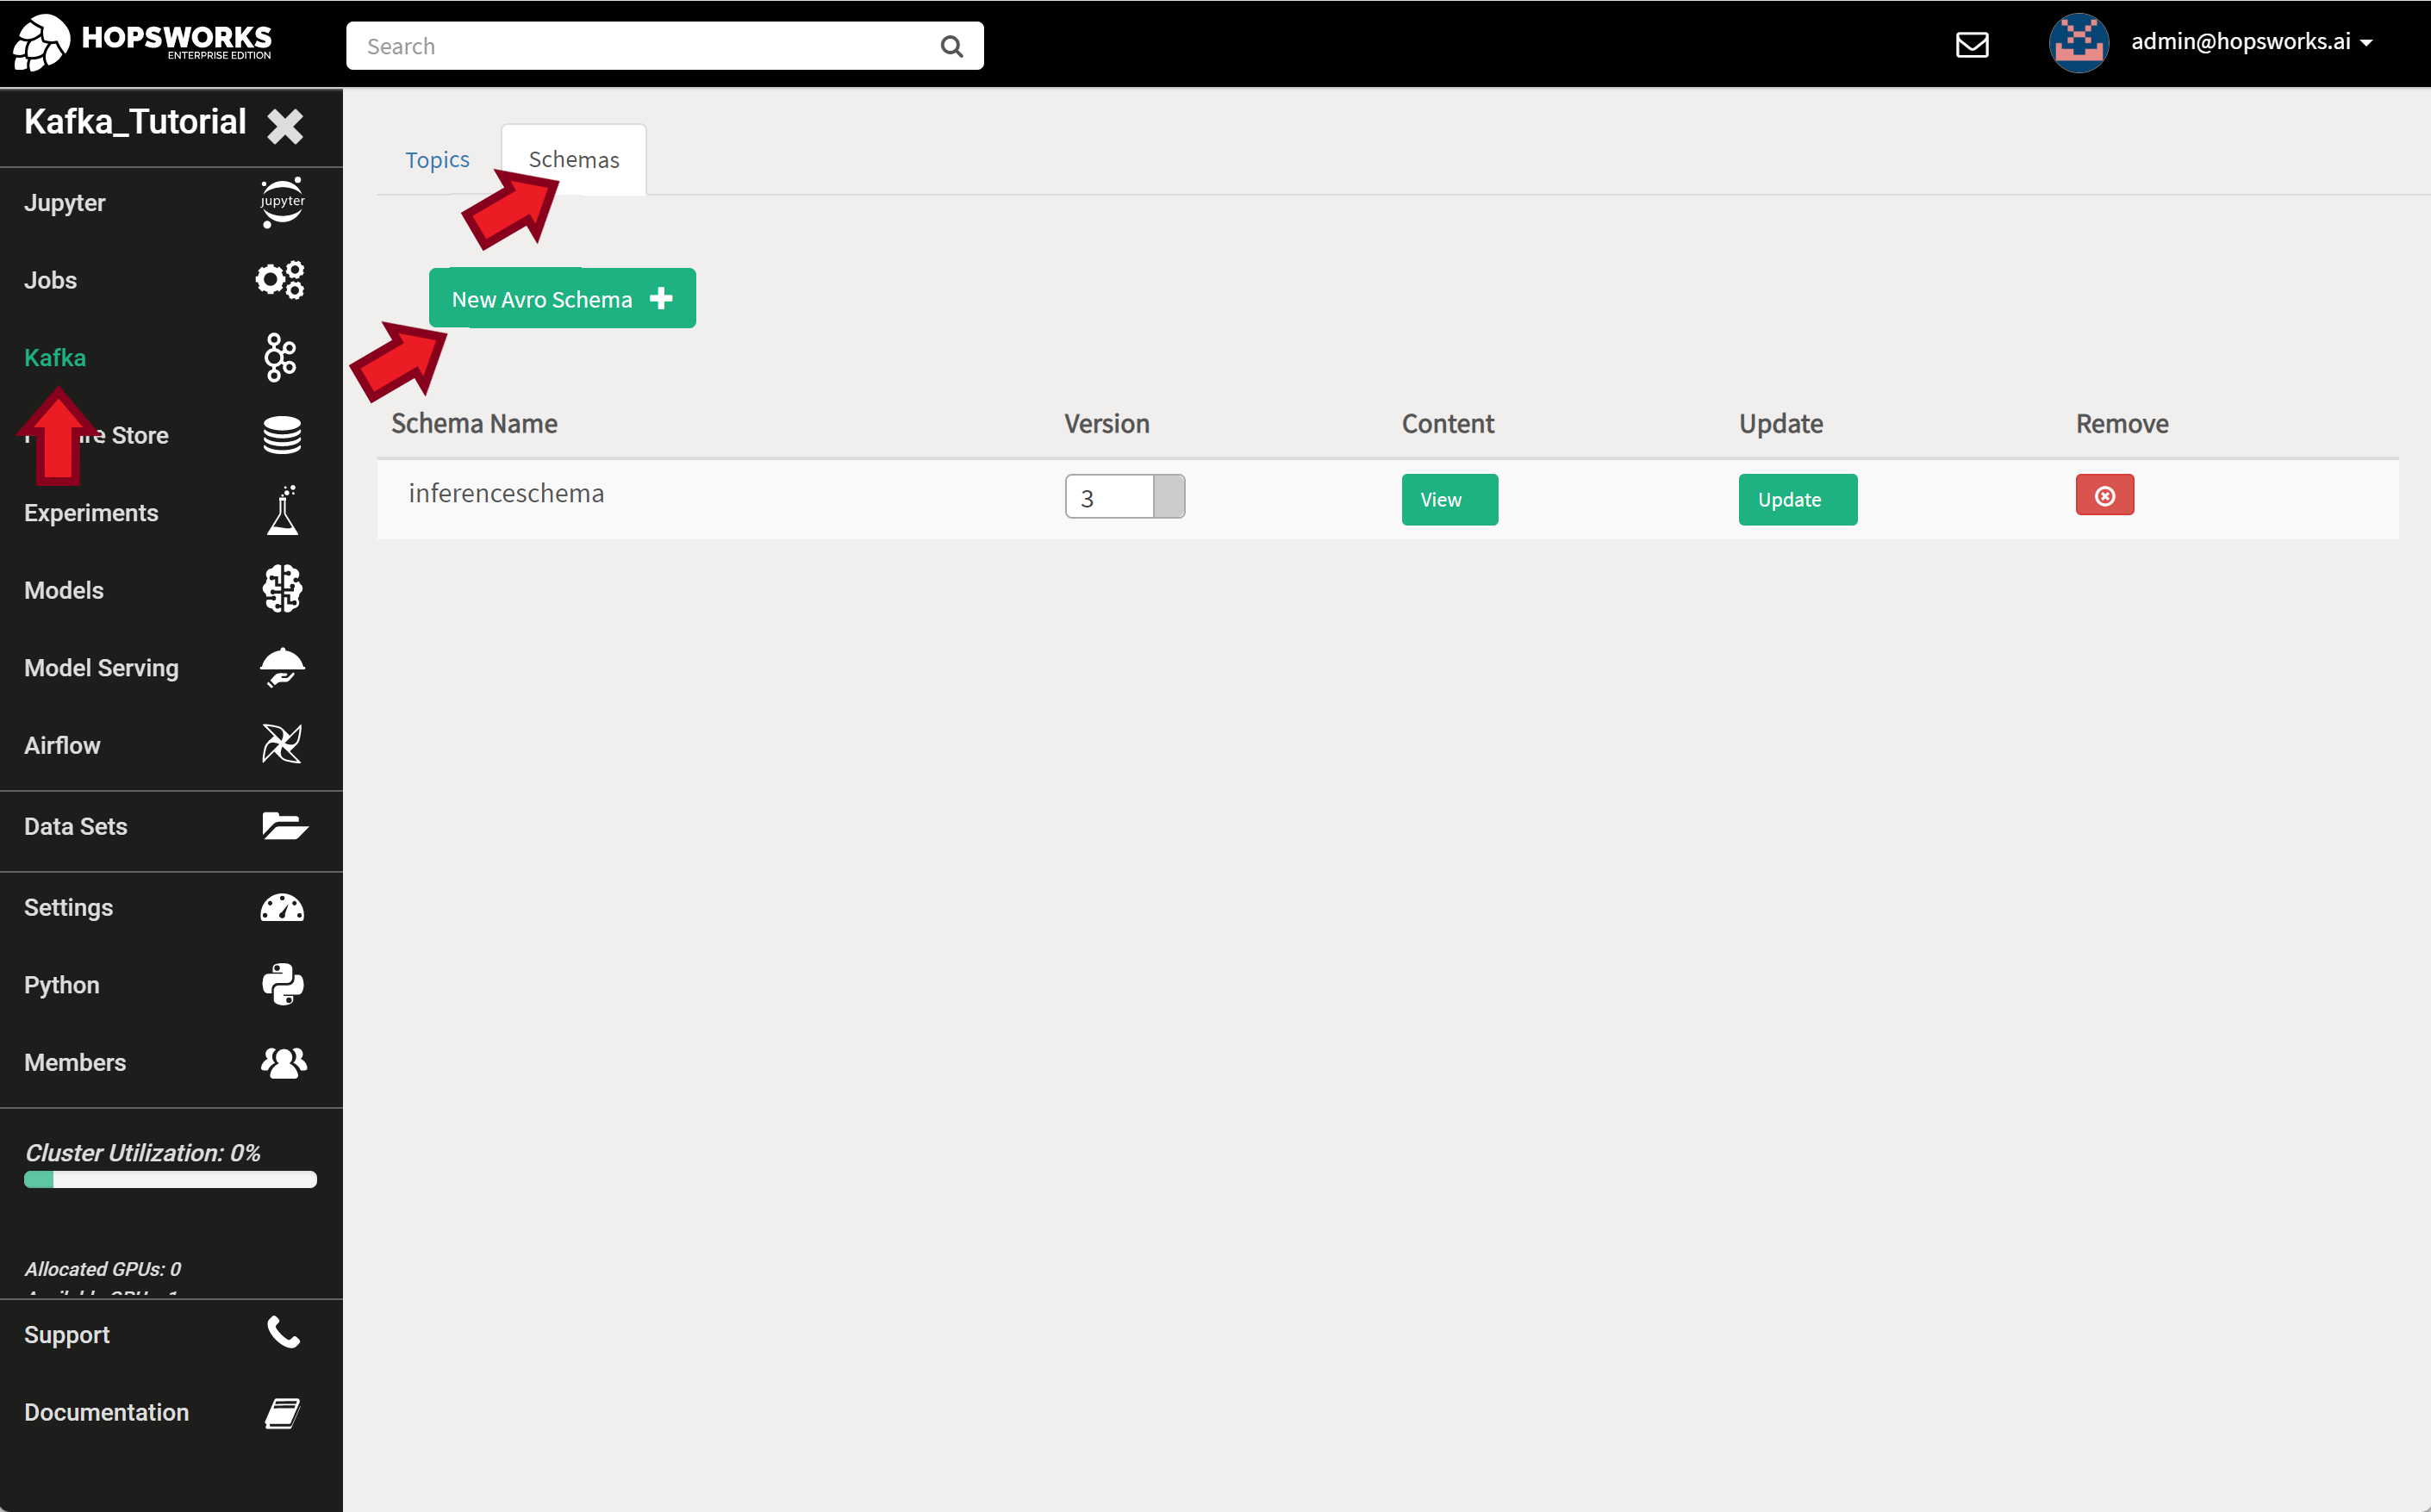
To register the above schema in Hopsworks, open the schemas settings in the Kafka tab and select New Avro Schema

Avro schema settings page

Then enter a Schema Name field for your schema and paste the schema itself in the content field. To check that the syntax of the schema is correct, press the Validate button. If everything is OK proceed by pressing the Create button.

Caution!

For the schema to work correctly with standard external clients, such as the Confluent Avro Producer/Consumer, the name given in the “Schema Name” field and in the schema declaration must be the same name. Furthermore, if you use a name space in the schema declaration, e.g., "namespace": "se.ri.kafka.tutorial", "name": "sensor", then the “Schema Name” field should contain the full name, i.e., se.ri.kafka.tutorial.sensor.

Registring a new Avro schema

Kafka Topic

Topics are a way to organize related events. A topic is like a buffer between event producers and event consumers. Events are durably stored in a topic and are not deleted after consumption. Events can be read as many times as needed and you define for how long Kafka should retain your events.

For scalability, a topic is divided into a number of partitions that are distributed across servers (called Kafka Brokers). Events are distributed among partitions either uniformly or by event key. Using an event key is recommended to guarantee that events from the same entity, e.g., user or sensor, end up in the same partition and thus processed in the correct order of arrival.

Tip

The number of partitions determine the maximum parallelism for processing (consuming) events by a single application. You can have as many event producers per topic as you want. Also there can be as many applications processing (consuming) events from a topic as needed. But within a single application, also known as a consumer group, the maximum parallelism (number of consumers) is defined by the number of partitions in the topic. This restriction is to guarantee the ordered processing of events within a topic.

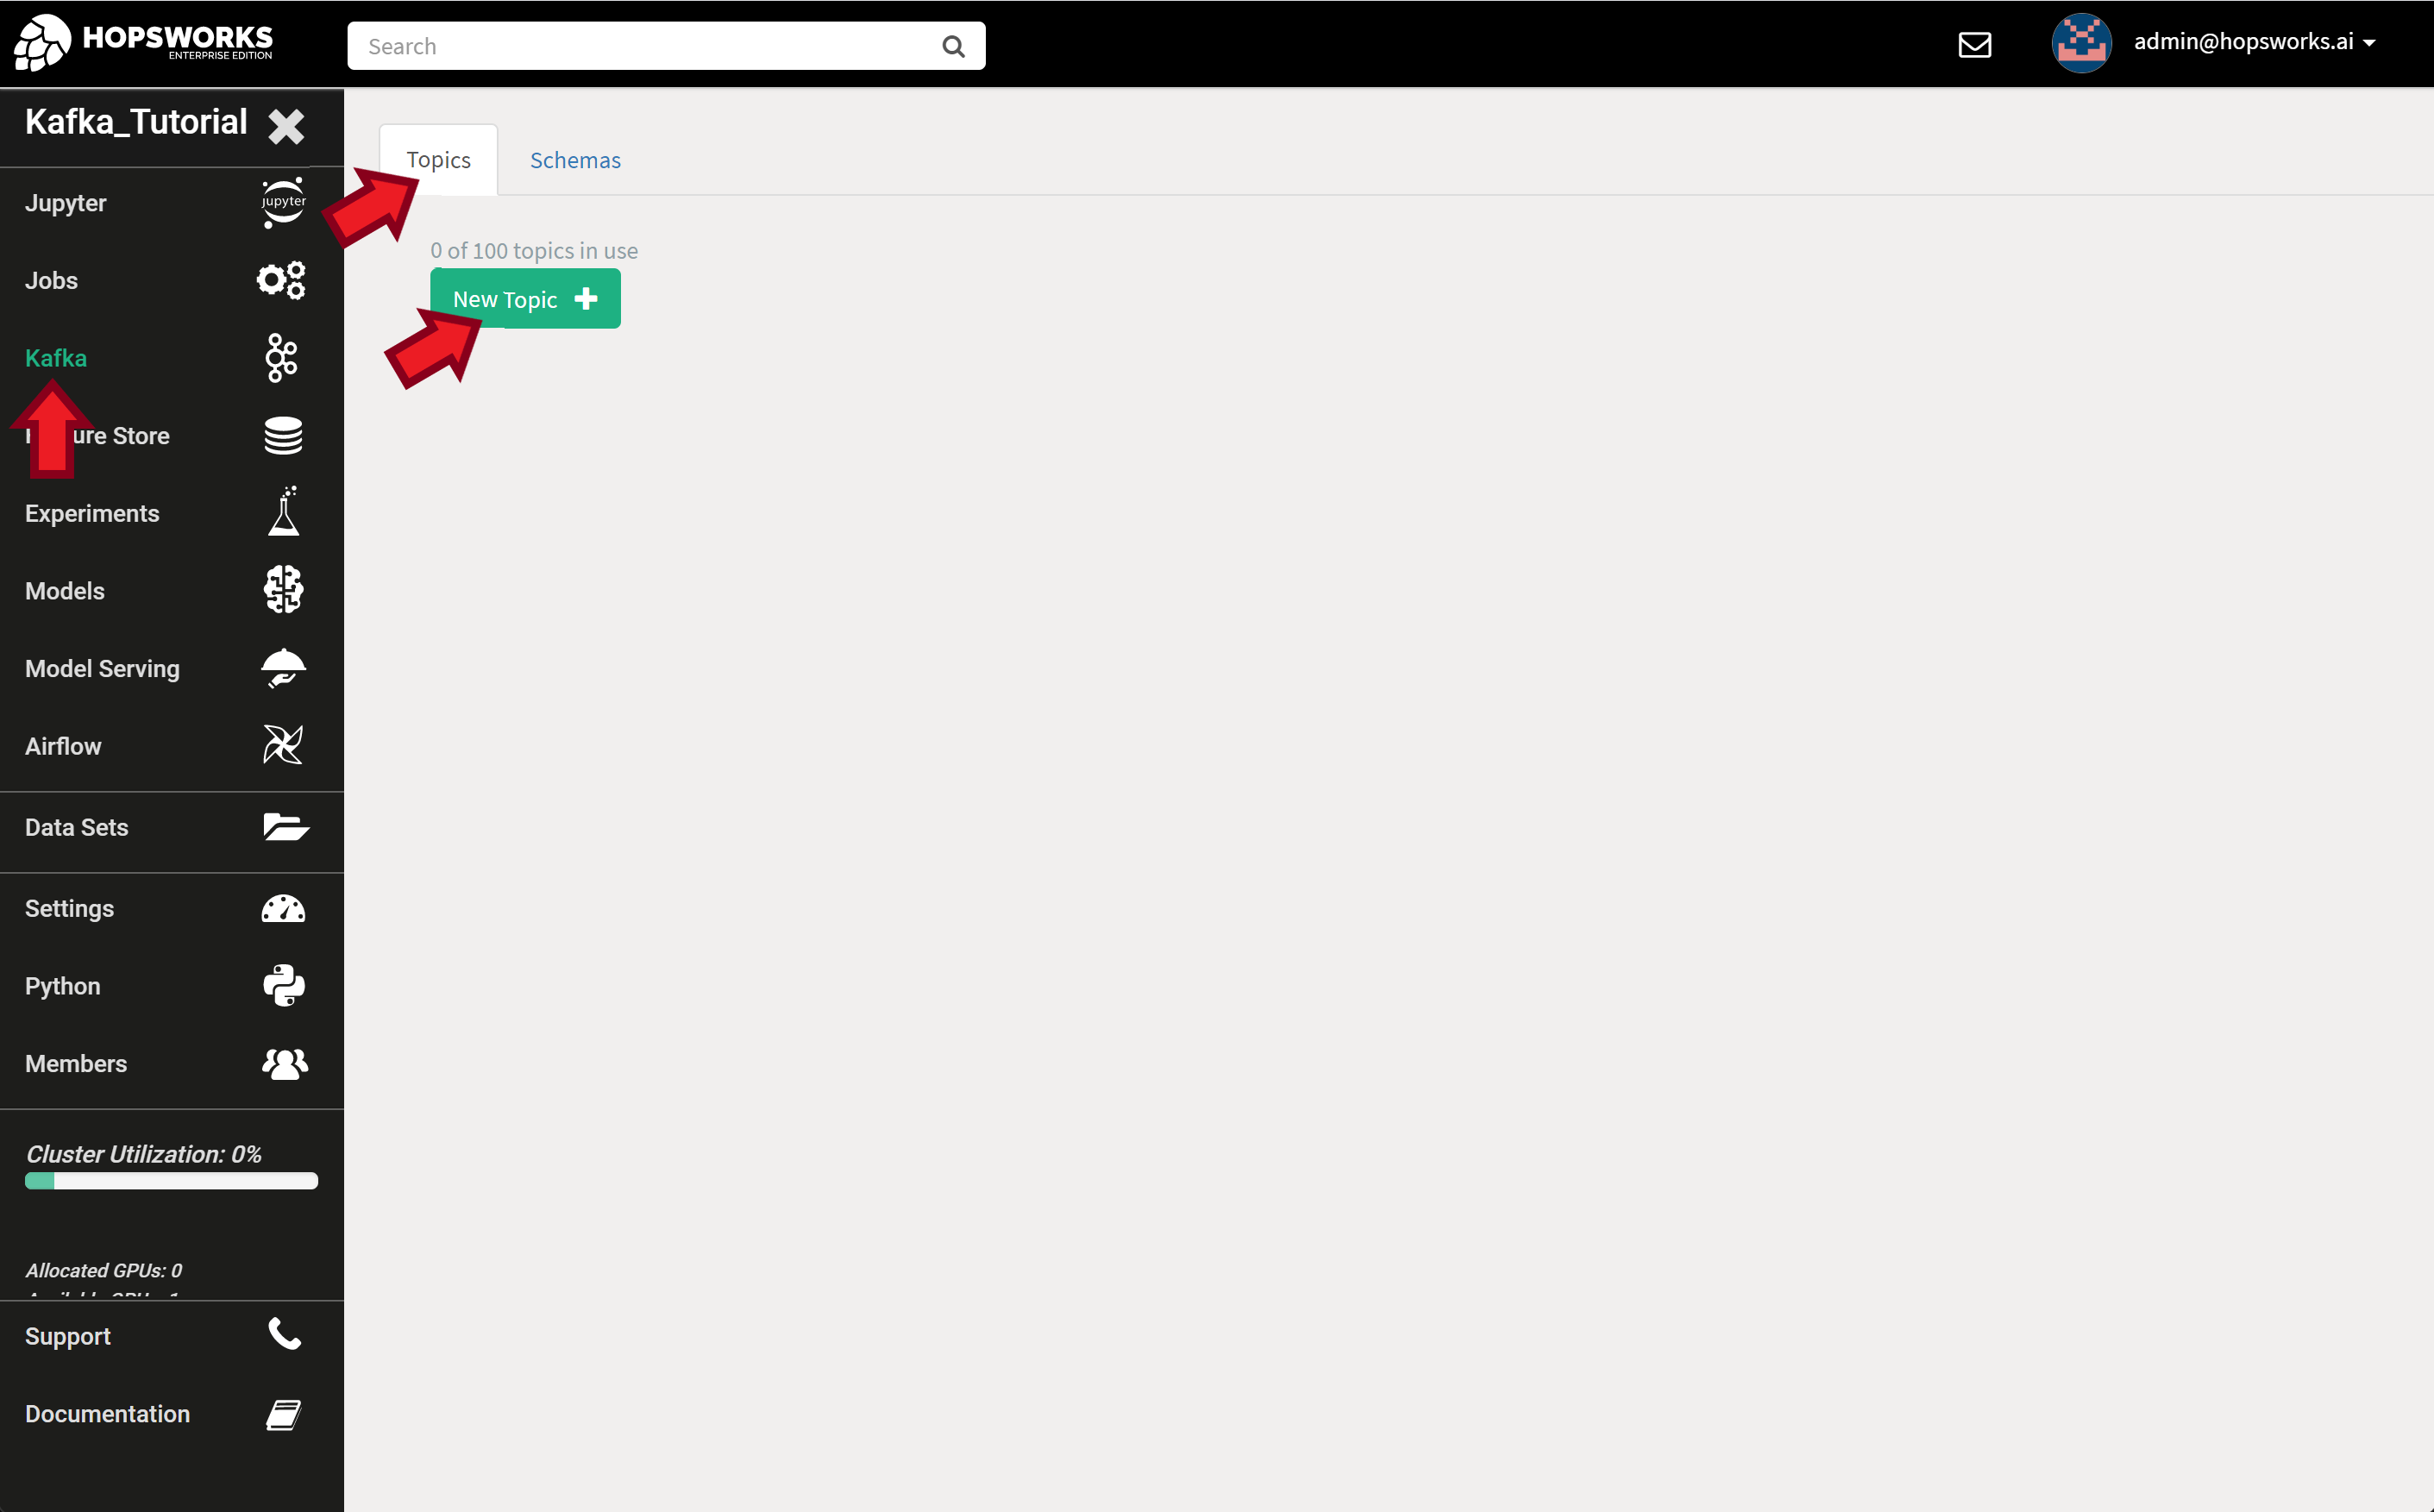
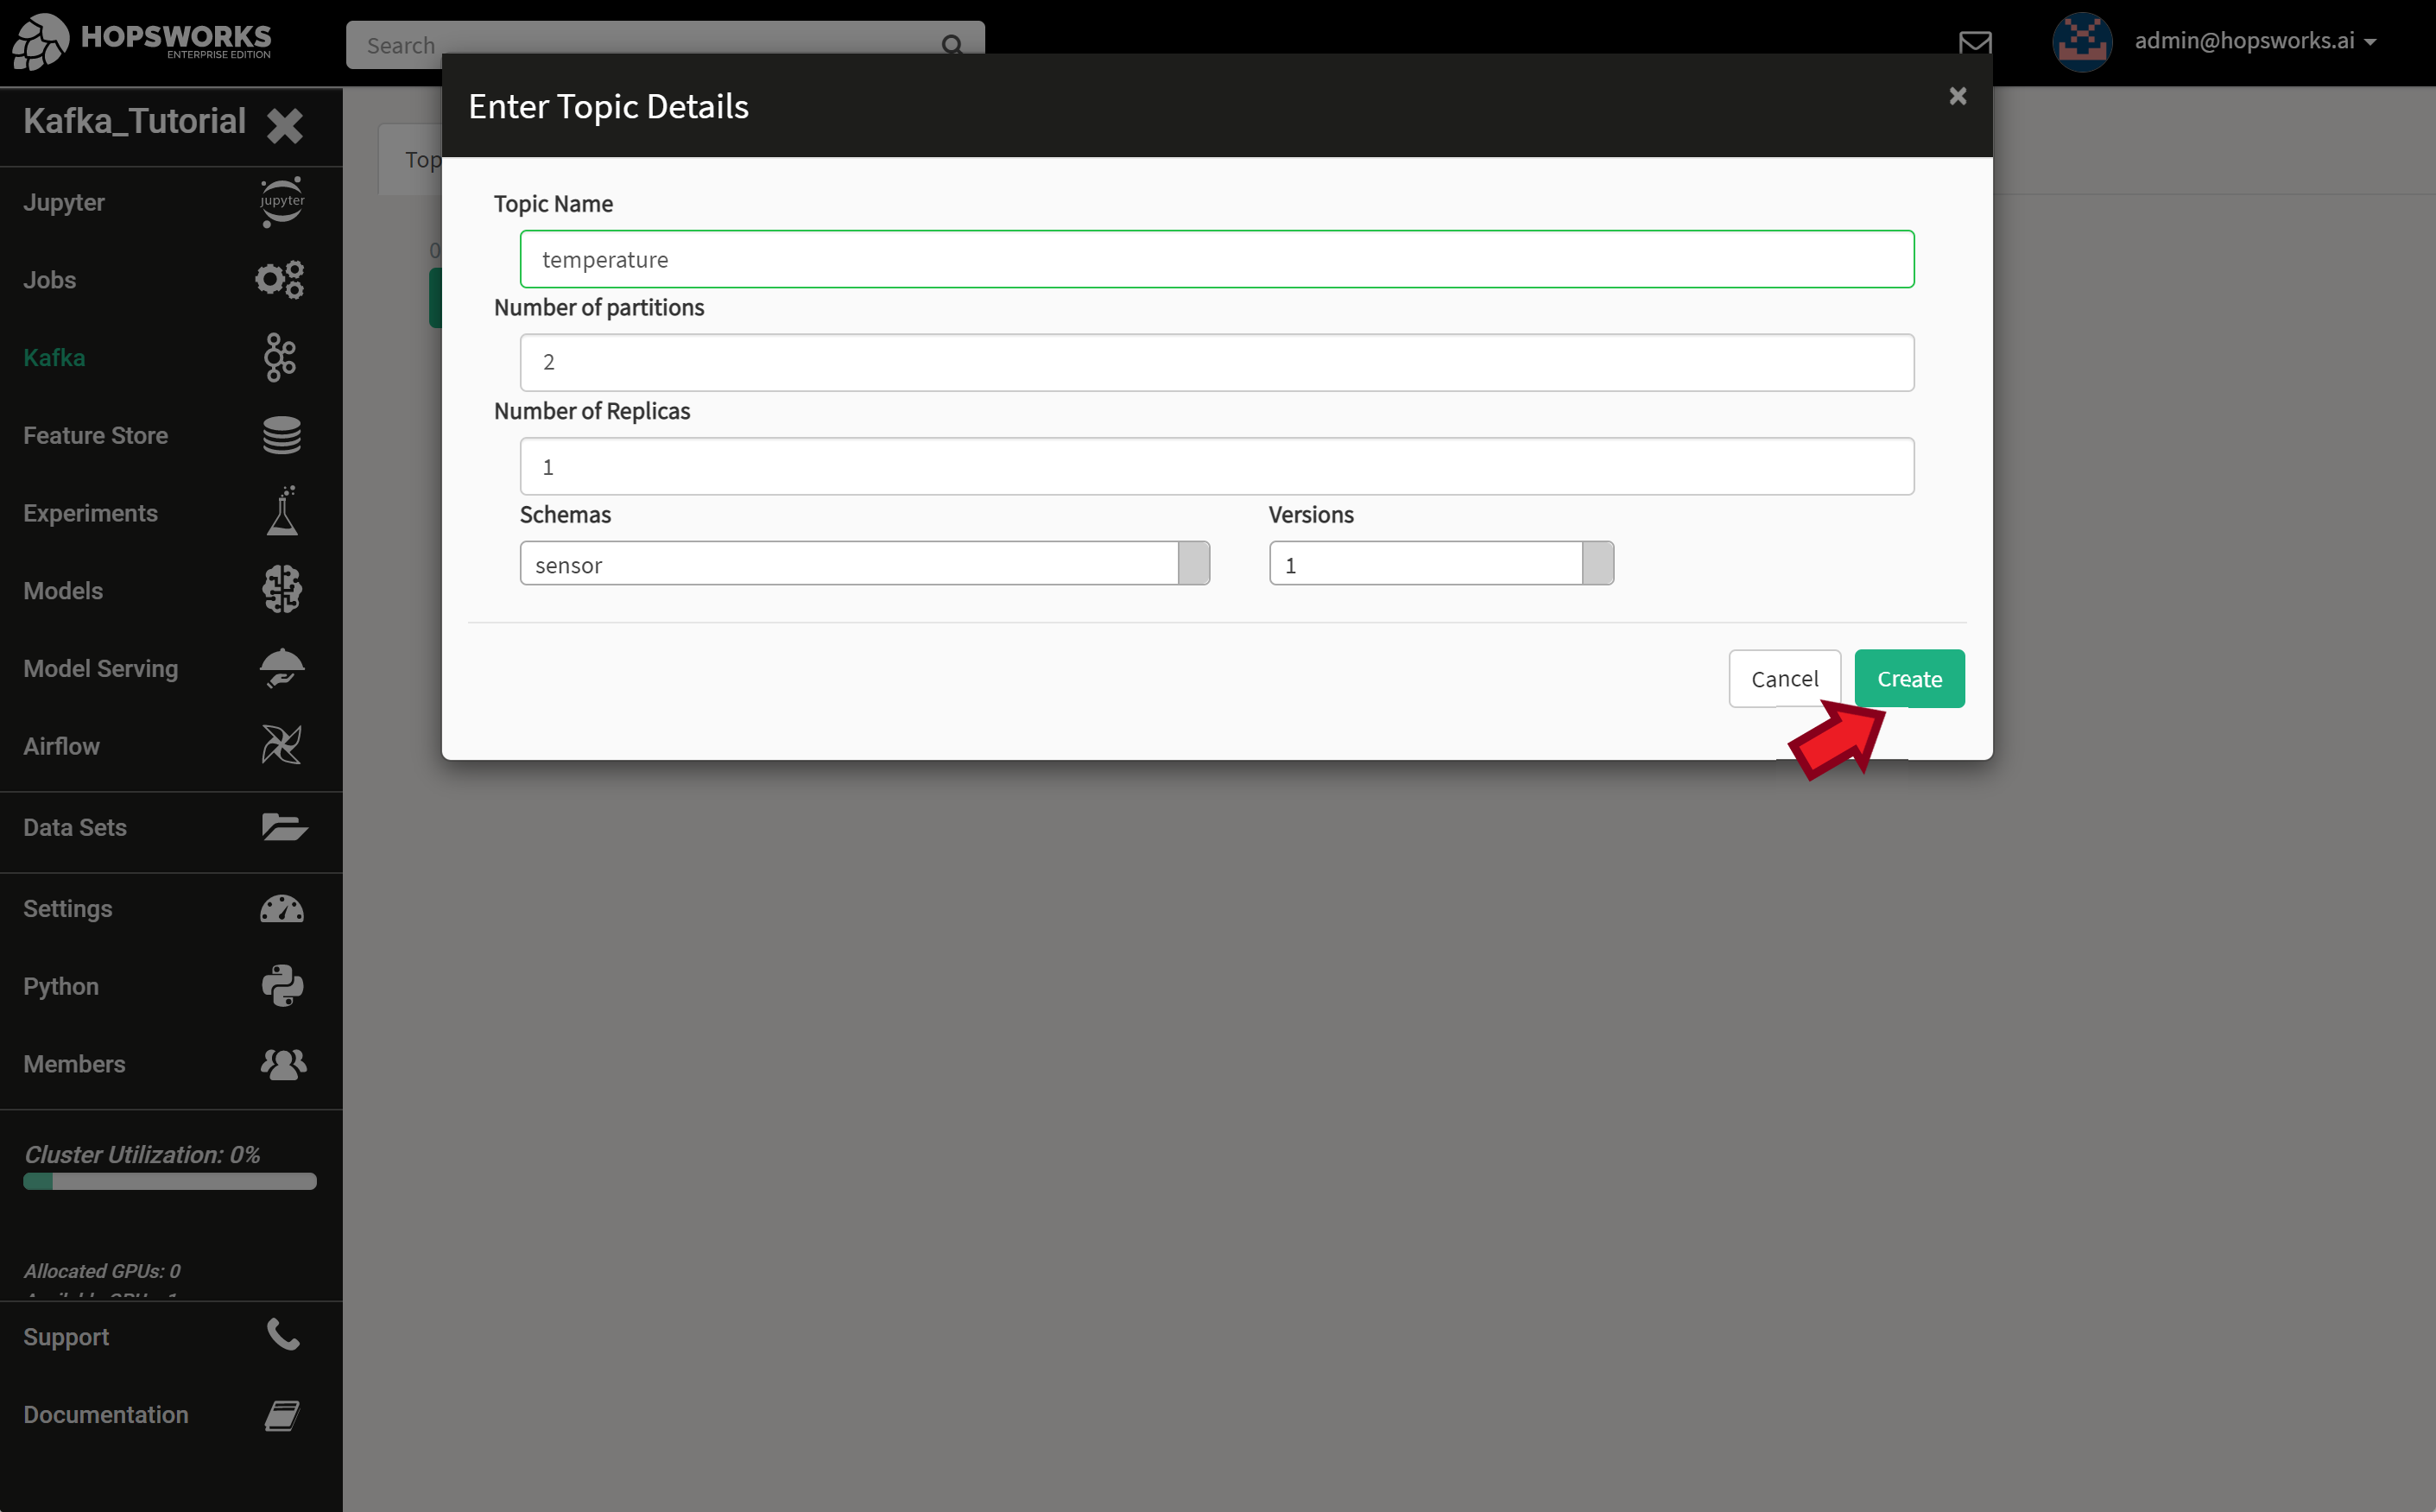
To create a new Kafka topic, open the topic settings in the Kafka tab and select New Topic.

Kafka topics settings page

Give your topic a name. This will be used later in the code to identify the topic. Enter the desired number of partitions and replication degree. Select a schema and schema version to use with this topic. For this tutorial, use the values shown in the image below.

Note

For testing, it is OK to set the number of partitions and replicas to 1. In a production system, you should always set the number of replicas to larger that 1 (typically 3) to avoid data loss on server failures and also select appropriate number of partitions to achieve the desired performance based on the expected number and rate of events.

Creating a new Kafka topic

Security Certificates

Hopsworks provide a secure Kafka-as-a-Service. Connecting your Python Producers and Consumers from an external server to the one provided by Hopsworks requires exporting the project certificates. These are used by the clients to securely connect and authenticate against the Hopsworks Kafka cluster. The certificates are downloaded as a keystore and trustore. These are designed used by Java/Scala programs and needs to be converted to .pem format to be used by Python and other non Java programs.

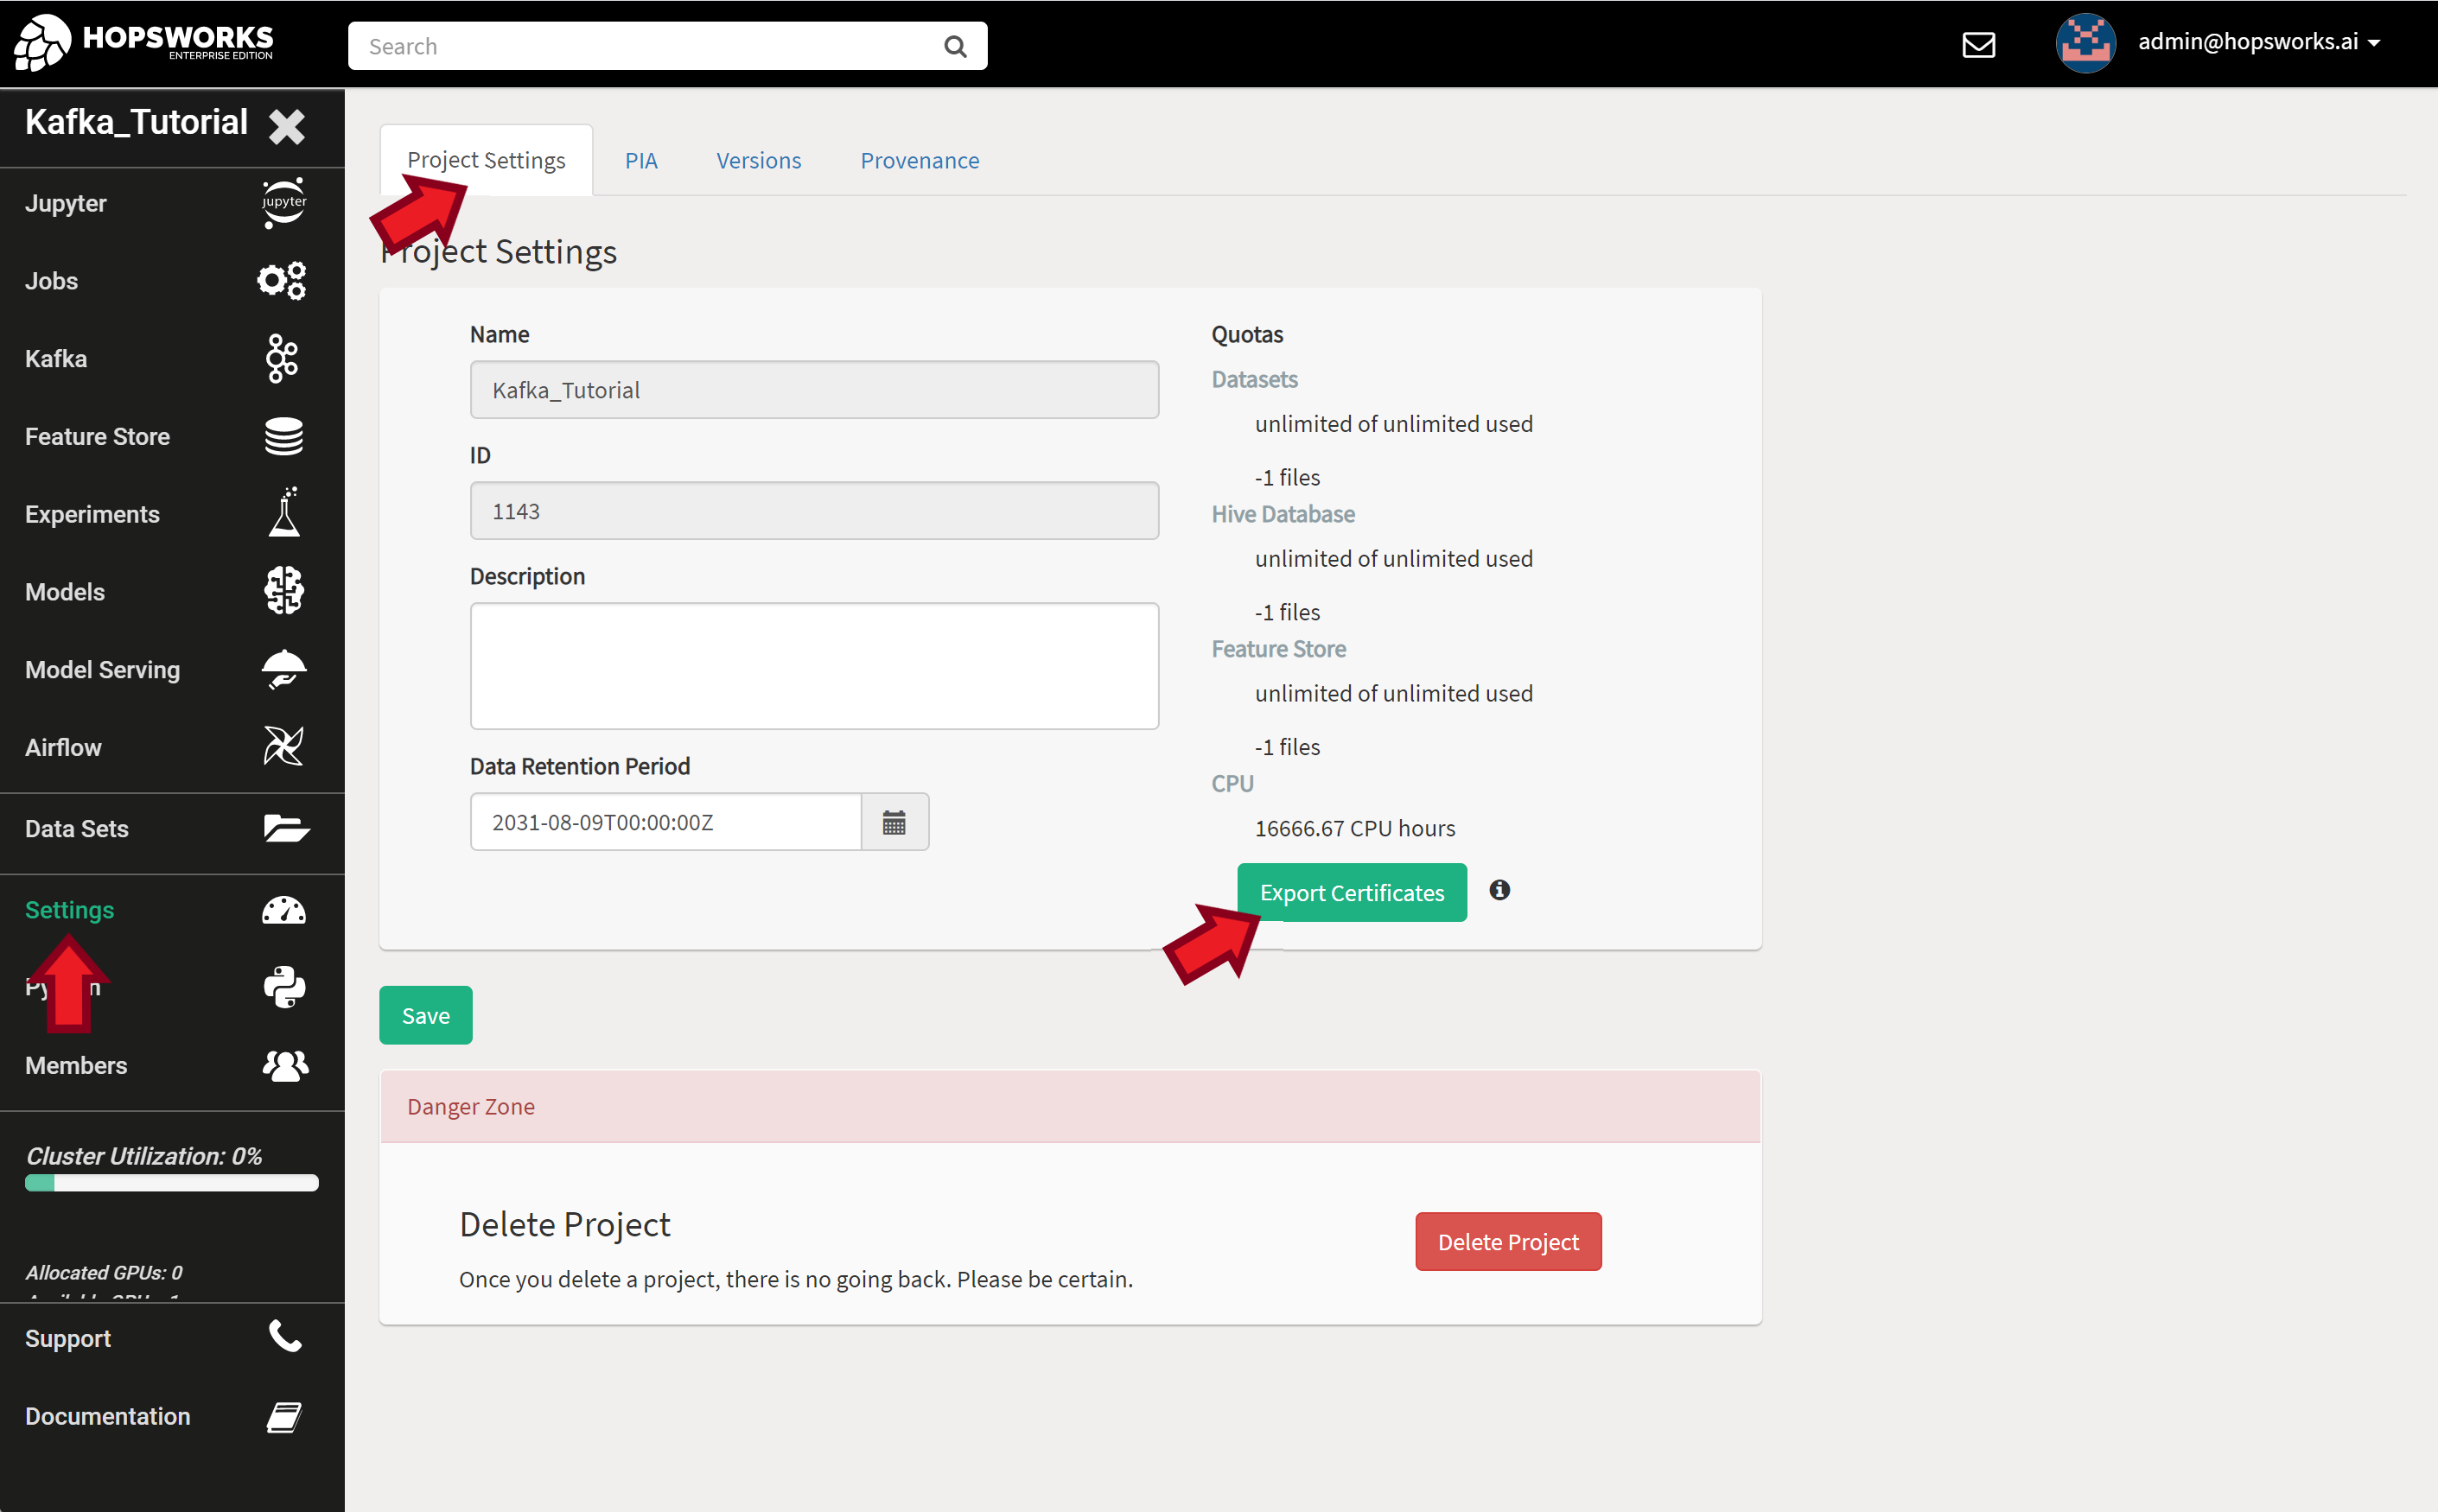
To export your projects’ certificates, go to Project Settings in the Settings tab and click Export Certificates.

Project settings page

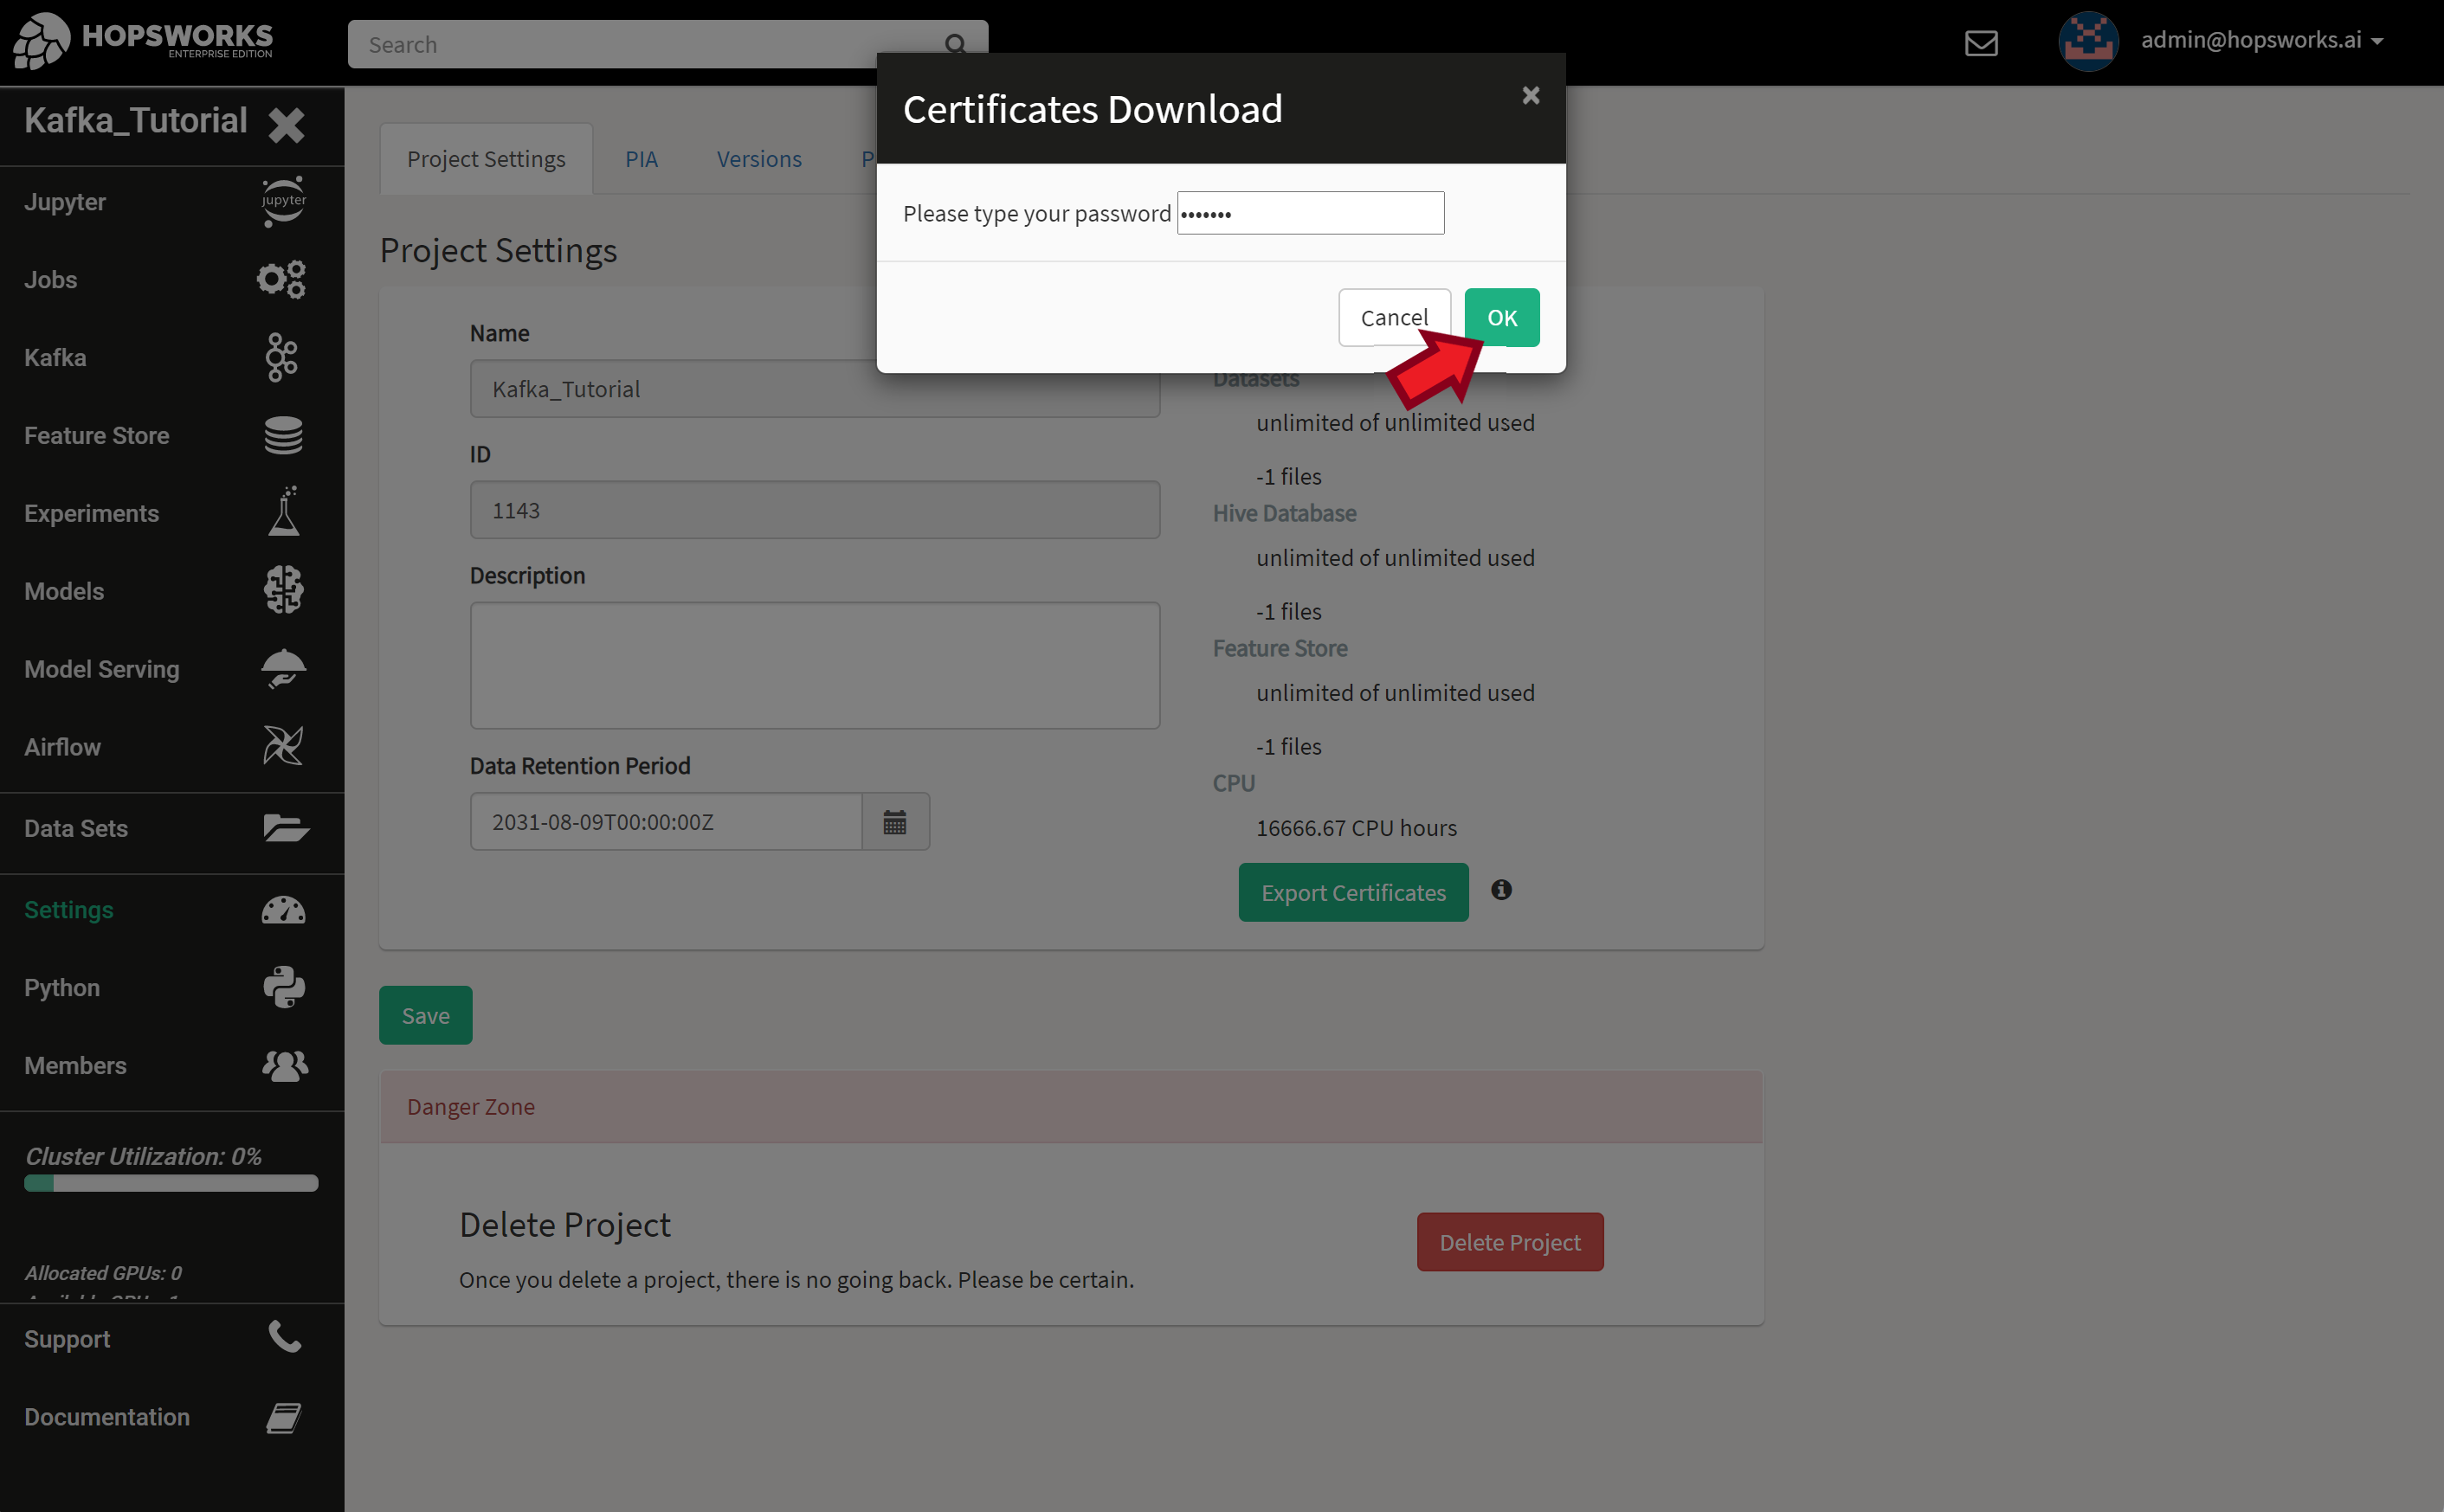
You will be asked to enter your login password before downloading.

Exporting project certificates (1/2)

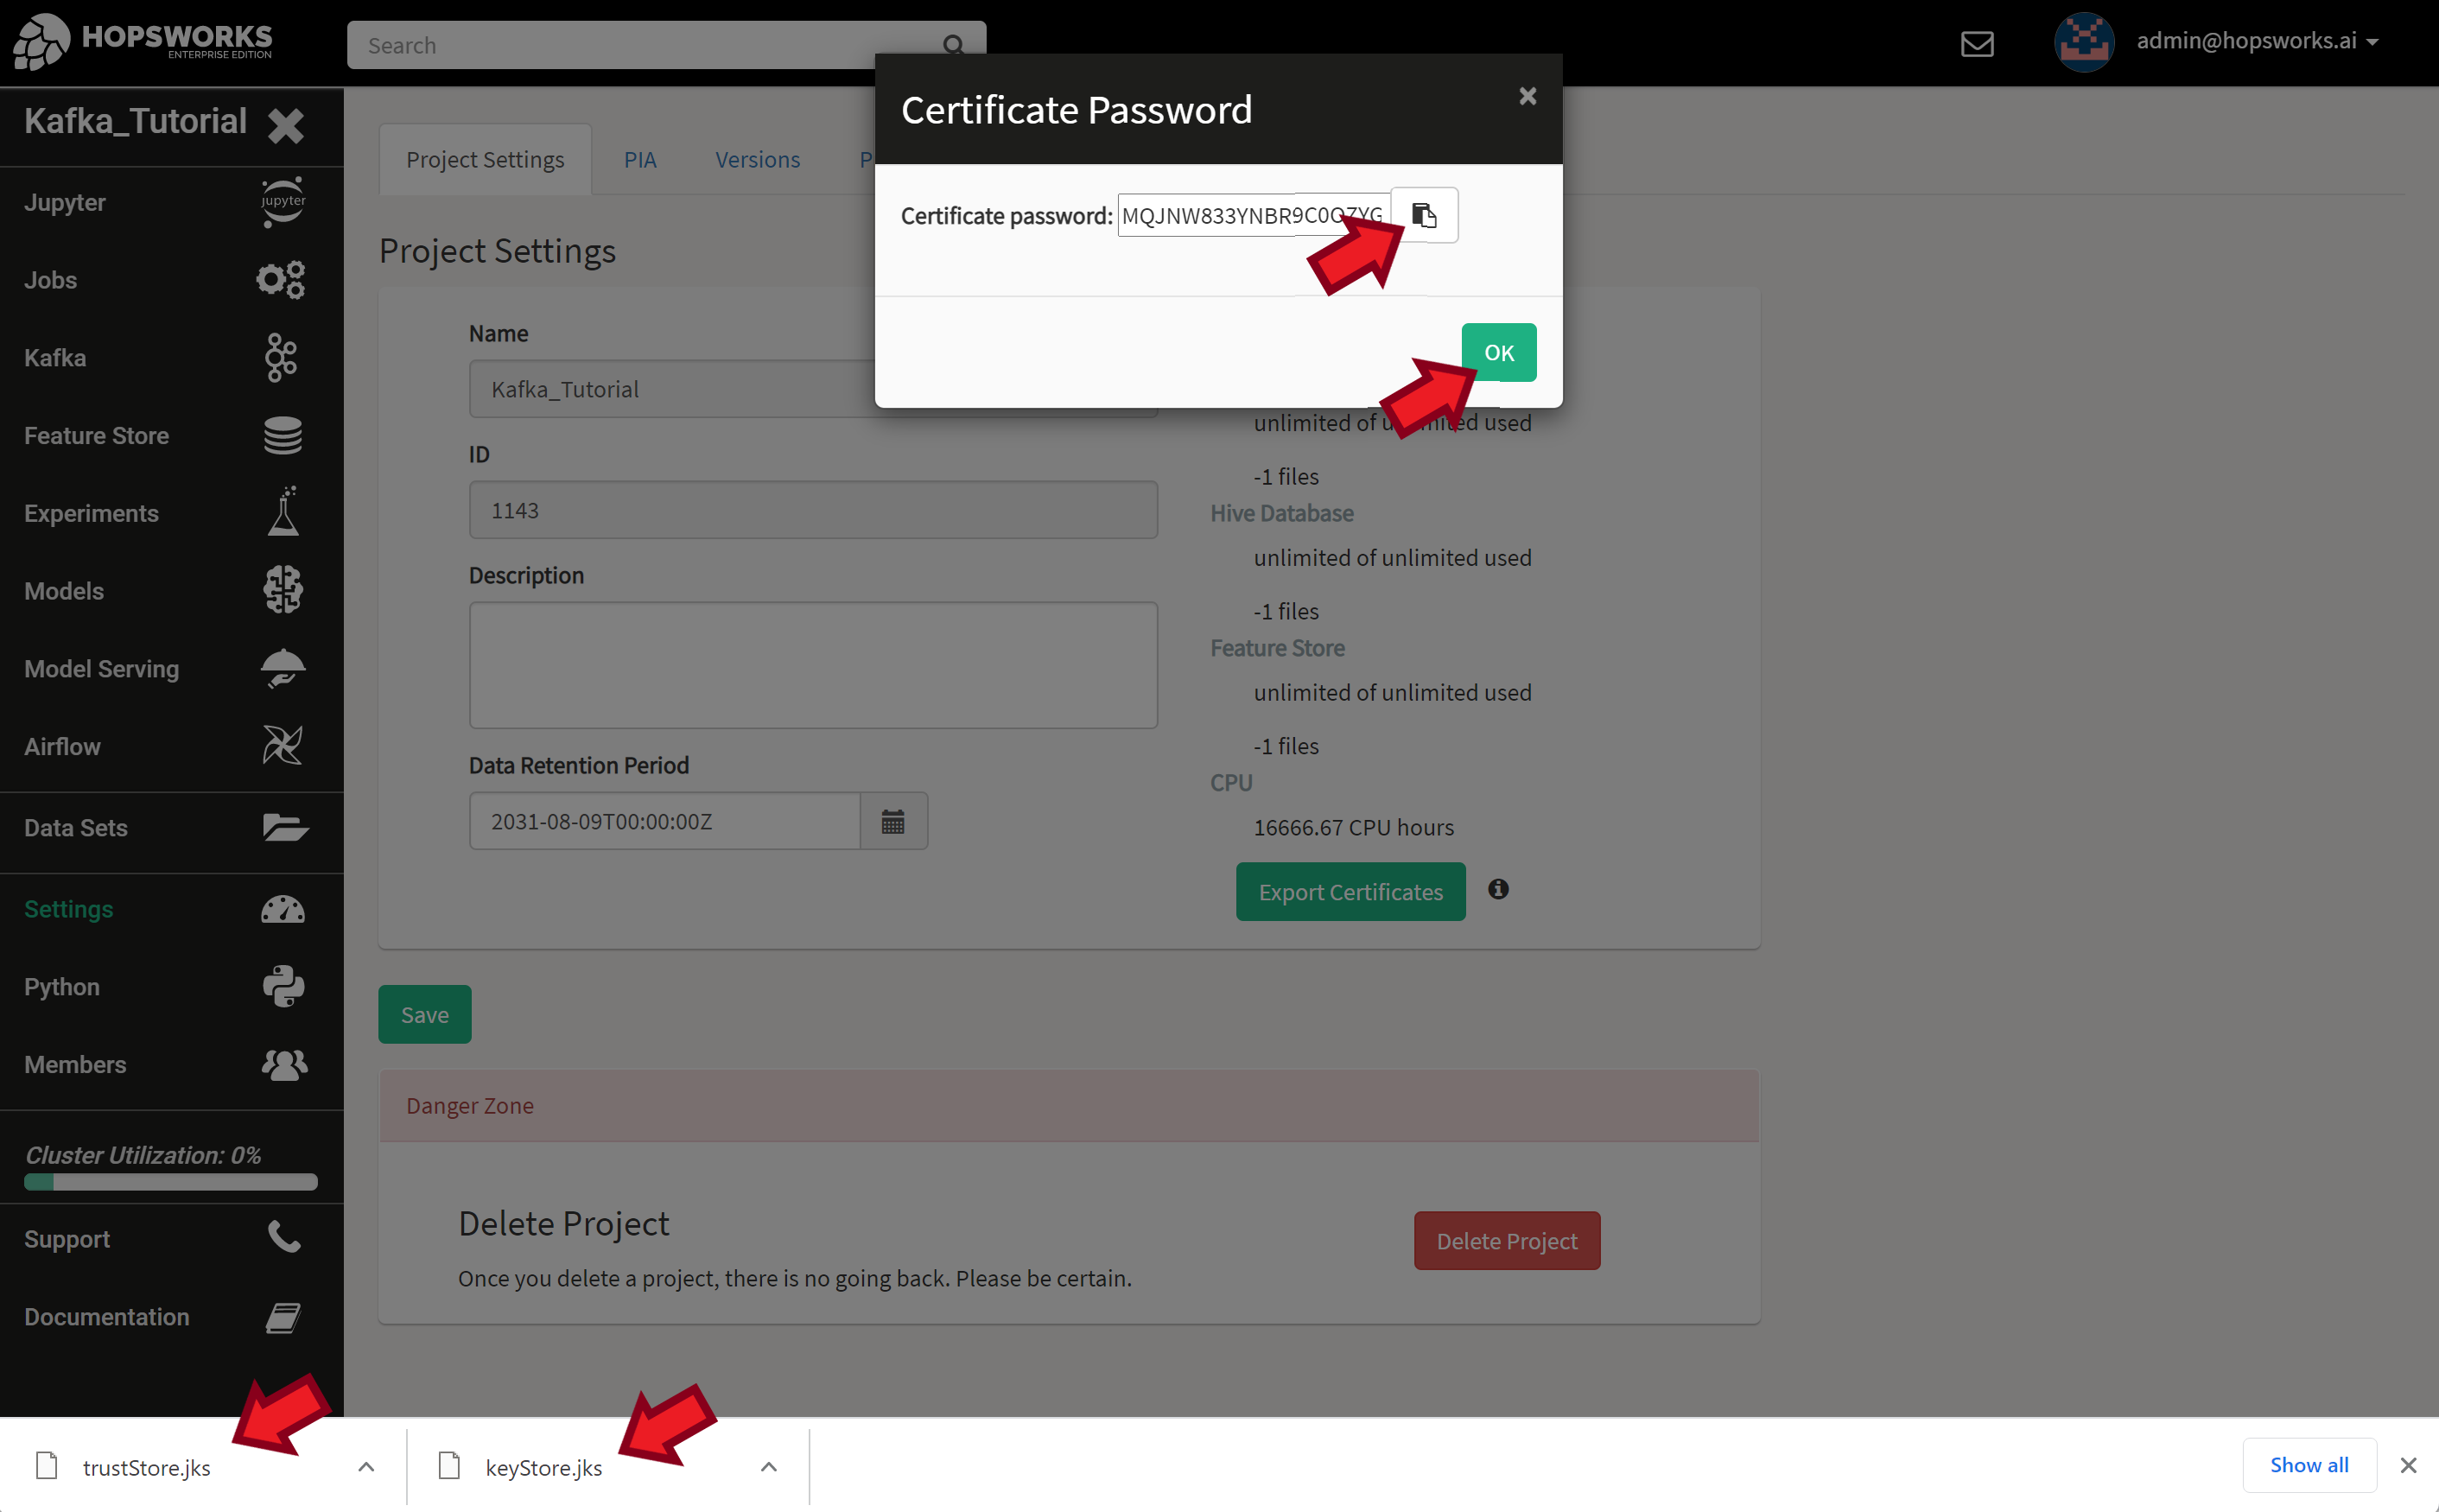
After successfully entering your password, two certificate files will be downloaded, trustStore.jks and keyStore.jks. The certificate password will be displayed. It’s a long string that is similar to:

MQJNW833YNBR9C0OZYGBGAB09P2PP4H5EHIALGWIT98I2PNSPTIXFCEI72FT0VLE

Important

Store these two files in a safe place as they give remote access to your project and data. Same goes for the password. Copy and save your password in a safe location as we’ll need it later.

Exporting project certificates (2/2)

Next, we’ll convert the JKS keyStore into an intermediate PKCS#12 keyStore, then into PEM file. You will be asked to enter a new password for each of the generated certificates and also the original certificate password you got from the previous step.

$ keytool -importkeystore -srckeystore keyStore.jks \
   -destkeystore keyStore.p12 \
   -srcstoretype jks \
   -deststoretype pkcs12
$ keytool -importkeystore -srckeystore keyStore.jks -destkeystore keyStore.p12 -srcstoretype jks -deststoretype pkcs12
Importing keystore keyStore.jks to keyStore.p12...
Enter destination keystore password:
Re-enter new password:
Enter source keystore password:
Entry for alias kafka_tutorial__meb10000 successfully imported.
Import command completed:  1 entries successfully imported, 0 entries failed or cancelled
$ openssl pkcs12 -in keyStore.p12 -out keyStore.pem
Enter Import Password:
Enter PEM pass phrase:
Verifying - Enter PEM pass phrase:
$ ls
keyStore.jks  keyStore.p12  keyStore.pem  trustStore.jks

We repeat the same steps for the trustStore.

$ keytool -importkeystore -srckeystore trustStore.jks \
   -destkeystore trustStore.p12 \
   -srcstoretype jks \
   -deststoretype pkcs12
$ keytool -importkeystore -srckeystore trustStore.jks -destkeystore trustStore.p12 -srcstoretype jks -deststoretype pkcs12
Importing keystore trustStore.jks to trustStore.p12...
Enter destination keystore password:
Re-enter new password:
Enter source keystore password:
Entry for alias hops_root_ca successfully imported.
Import command completed:  1 entries successfully imported, 0 entries failed or cancelled
$ openssl pkcs12 -in trustStore.p12 -out trustStore.pem
Enter Import Password:
$ ls
keyStore.jks  keyStore.p12  keyStore.pem  trustStore.jks  trustStore.p12  trustStore.pem

Now you should have keyStore.pem and trustStore.pem that we’ll use in the rest of this tutorial. You can safely delete the intermediate .p12 files.

API Key

Hopsworks provides a rich REST API to interact with most of the available services. One of these services is the Schema Registry that we’ll be using in this tutorial. To access the REST API we’ll need an API Key.

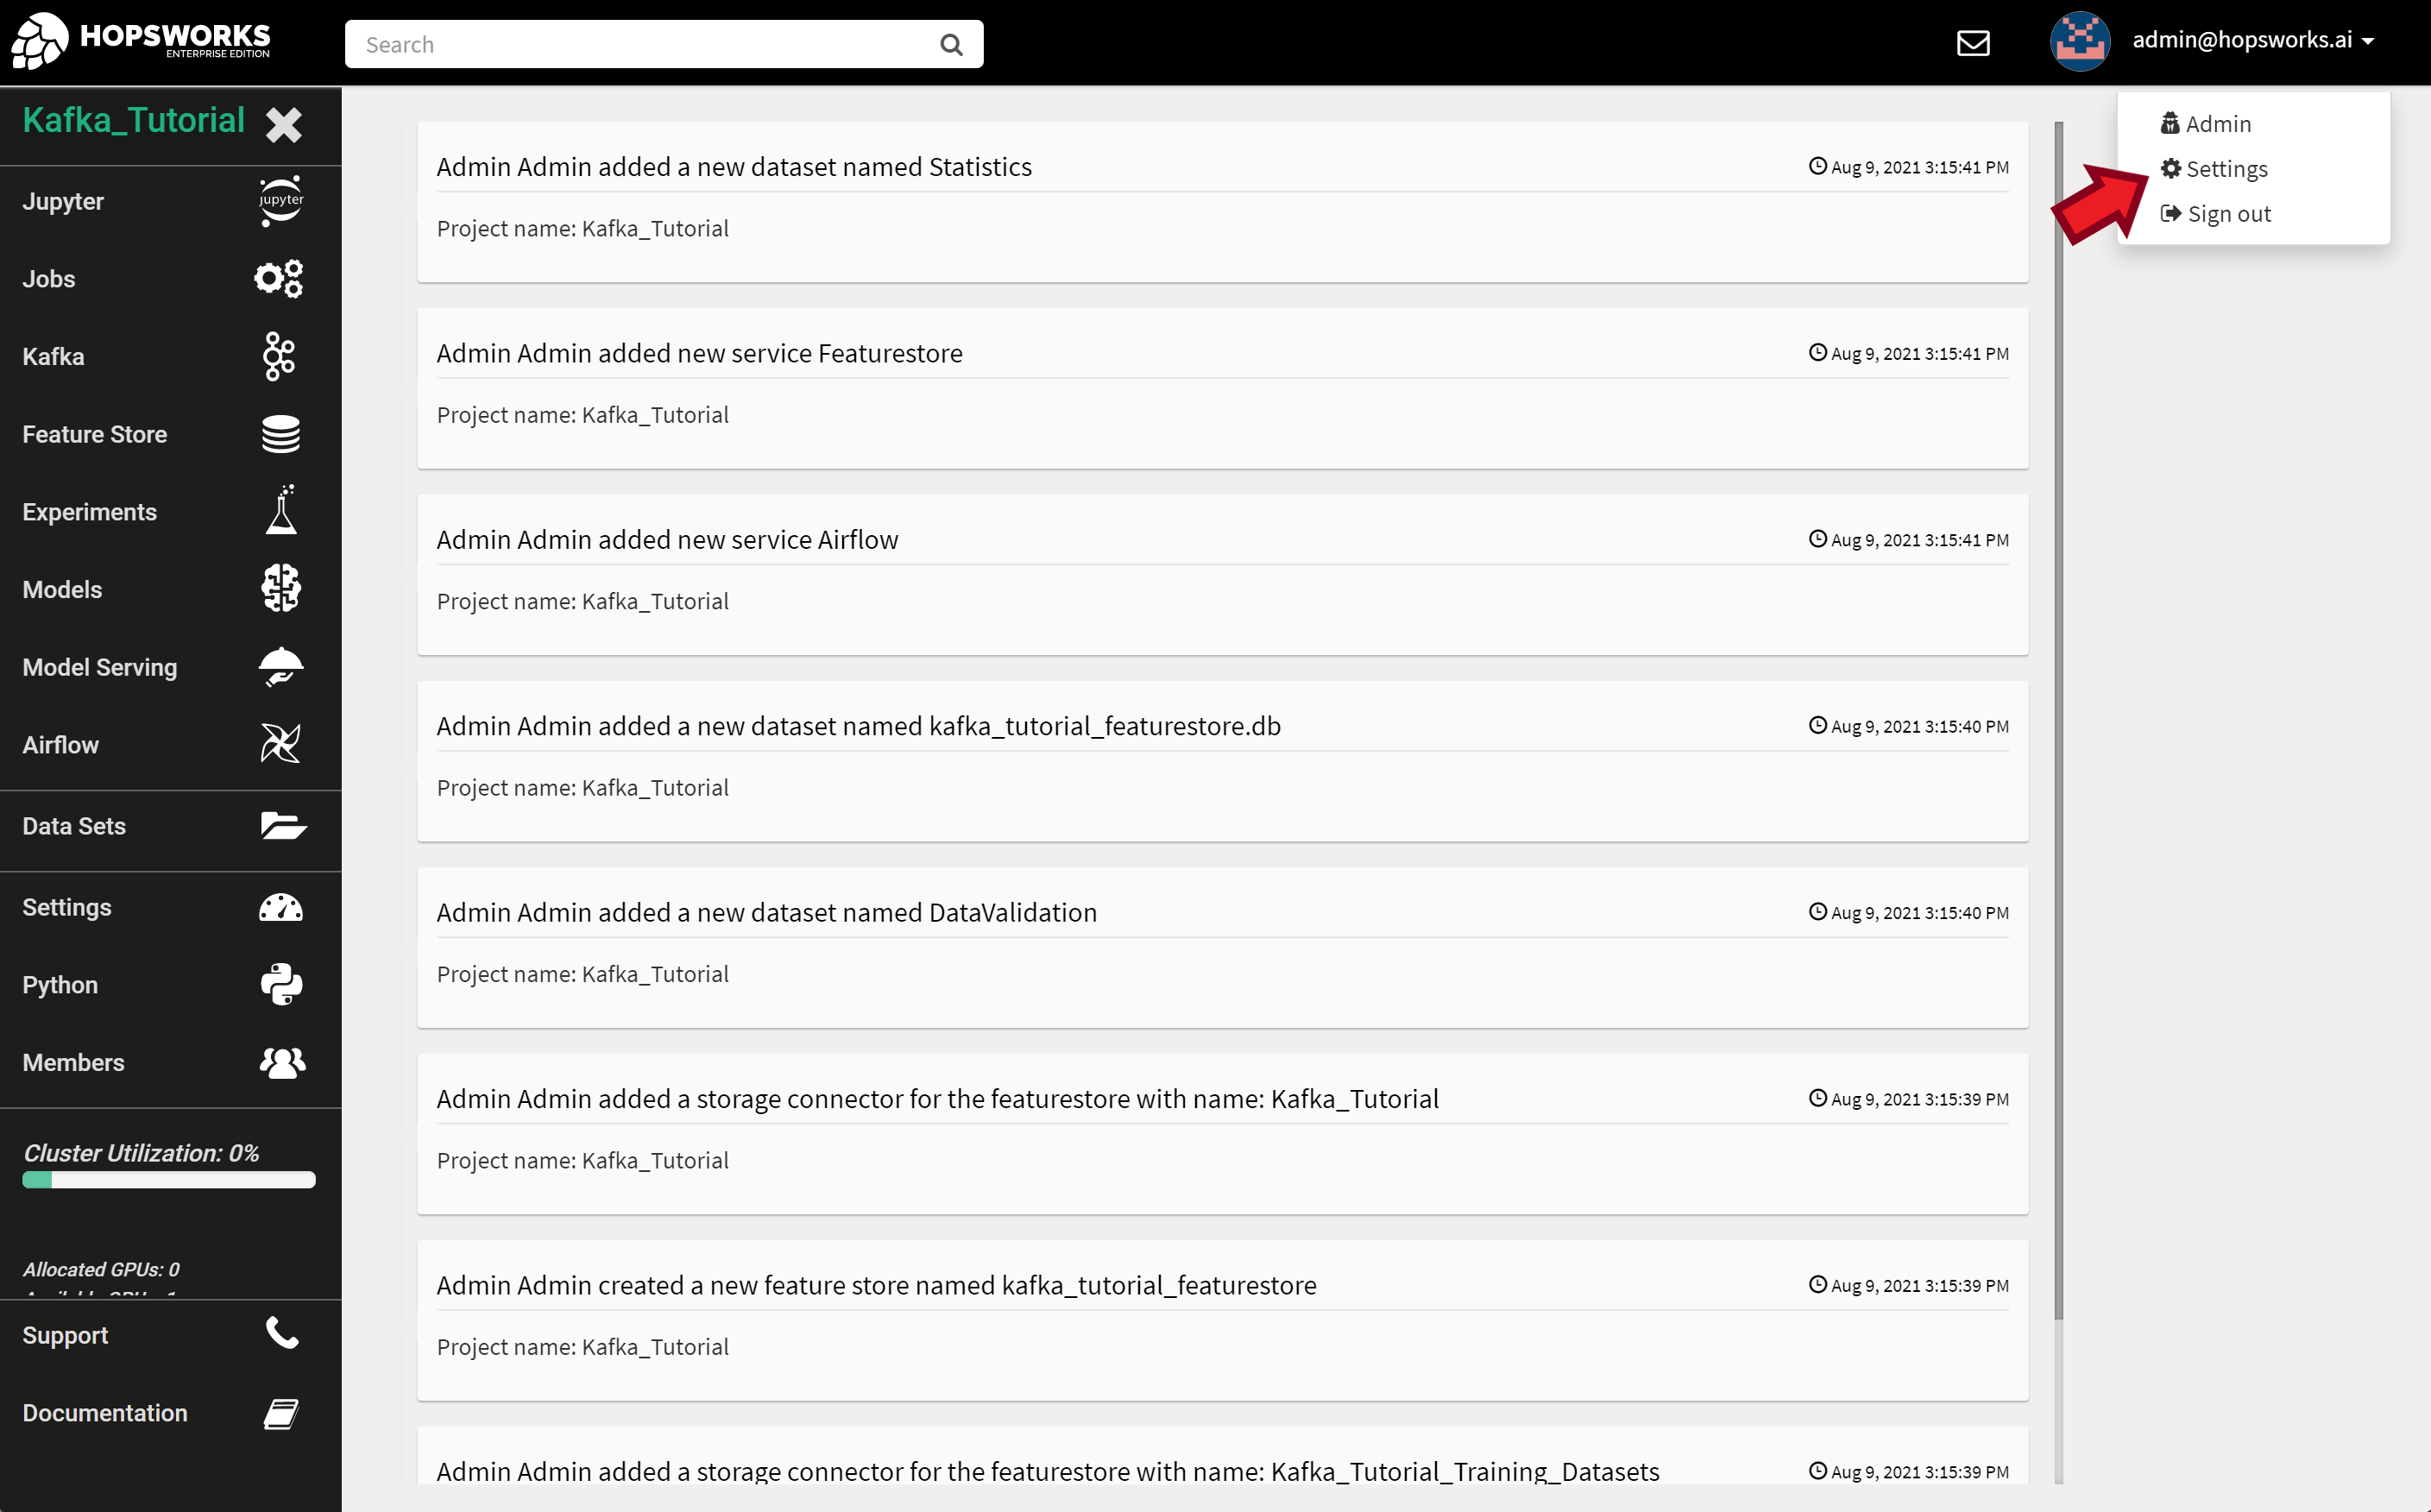
To create a new API Key associated with your account, open your user account settings.

Account Settings

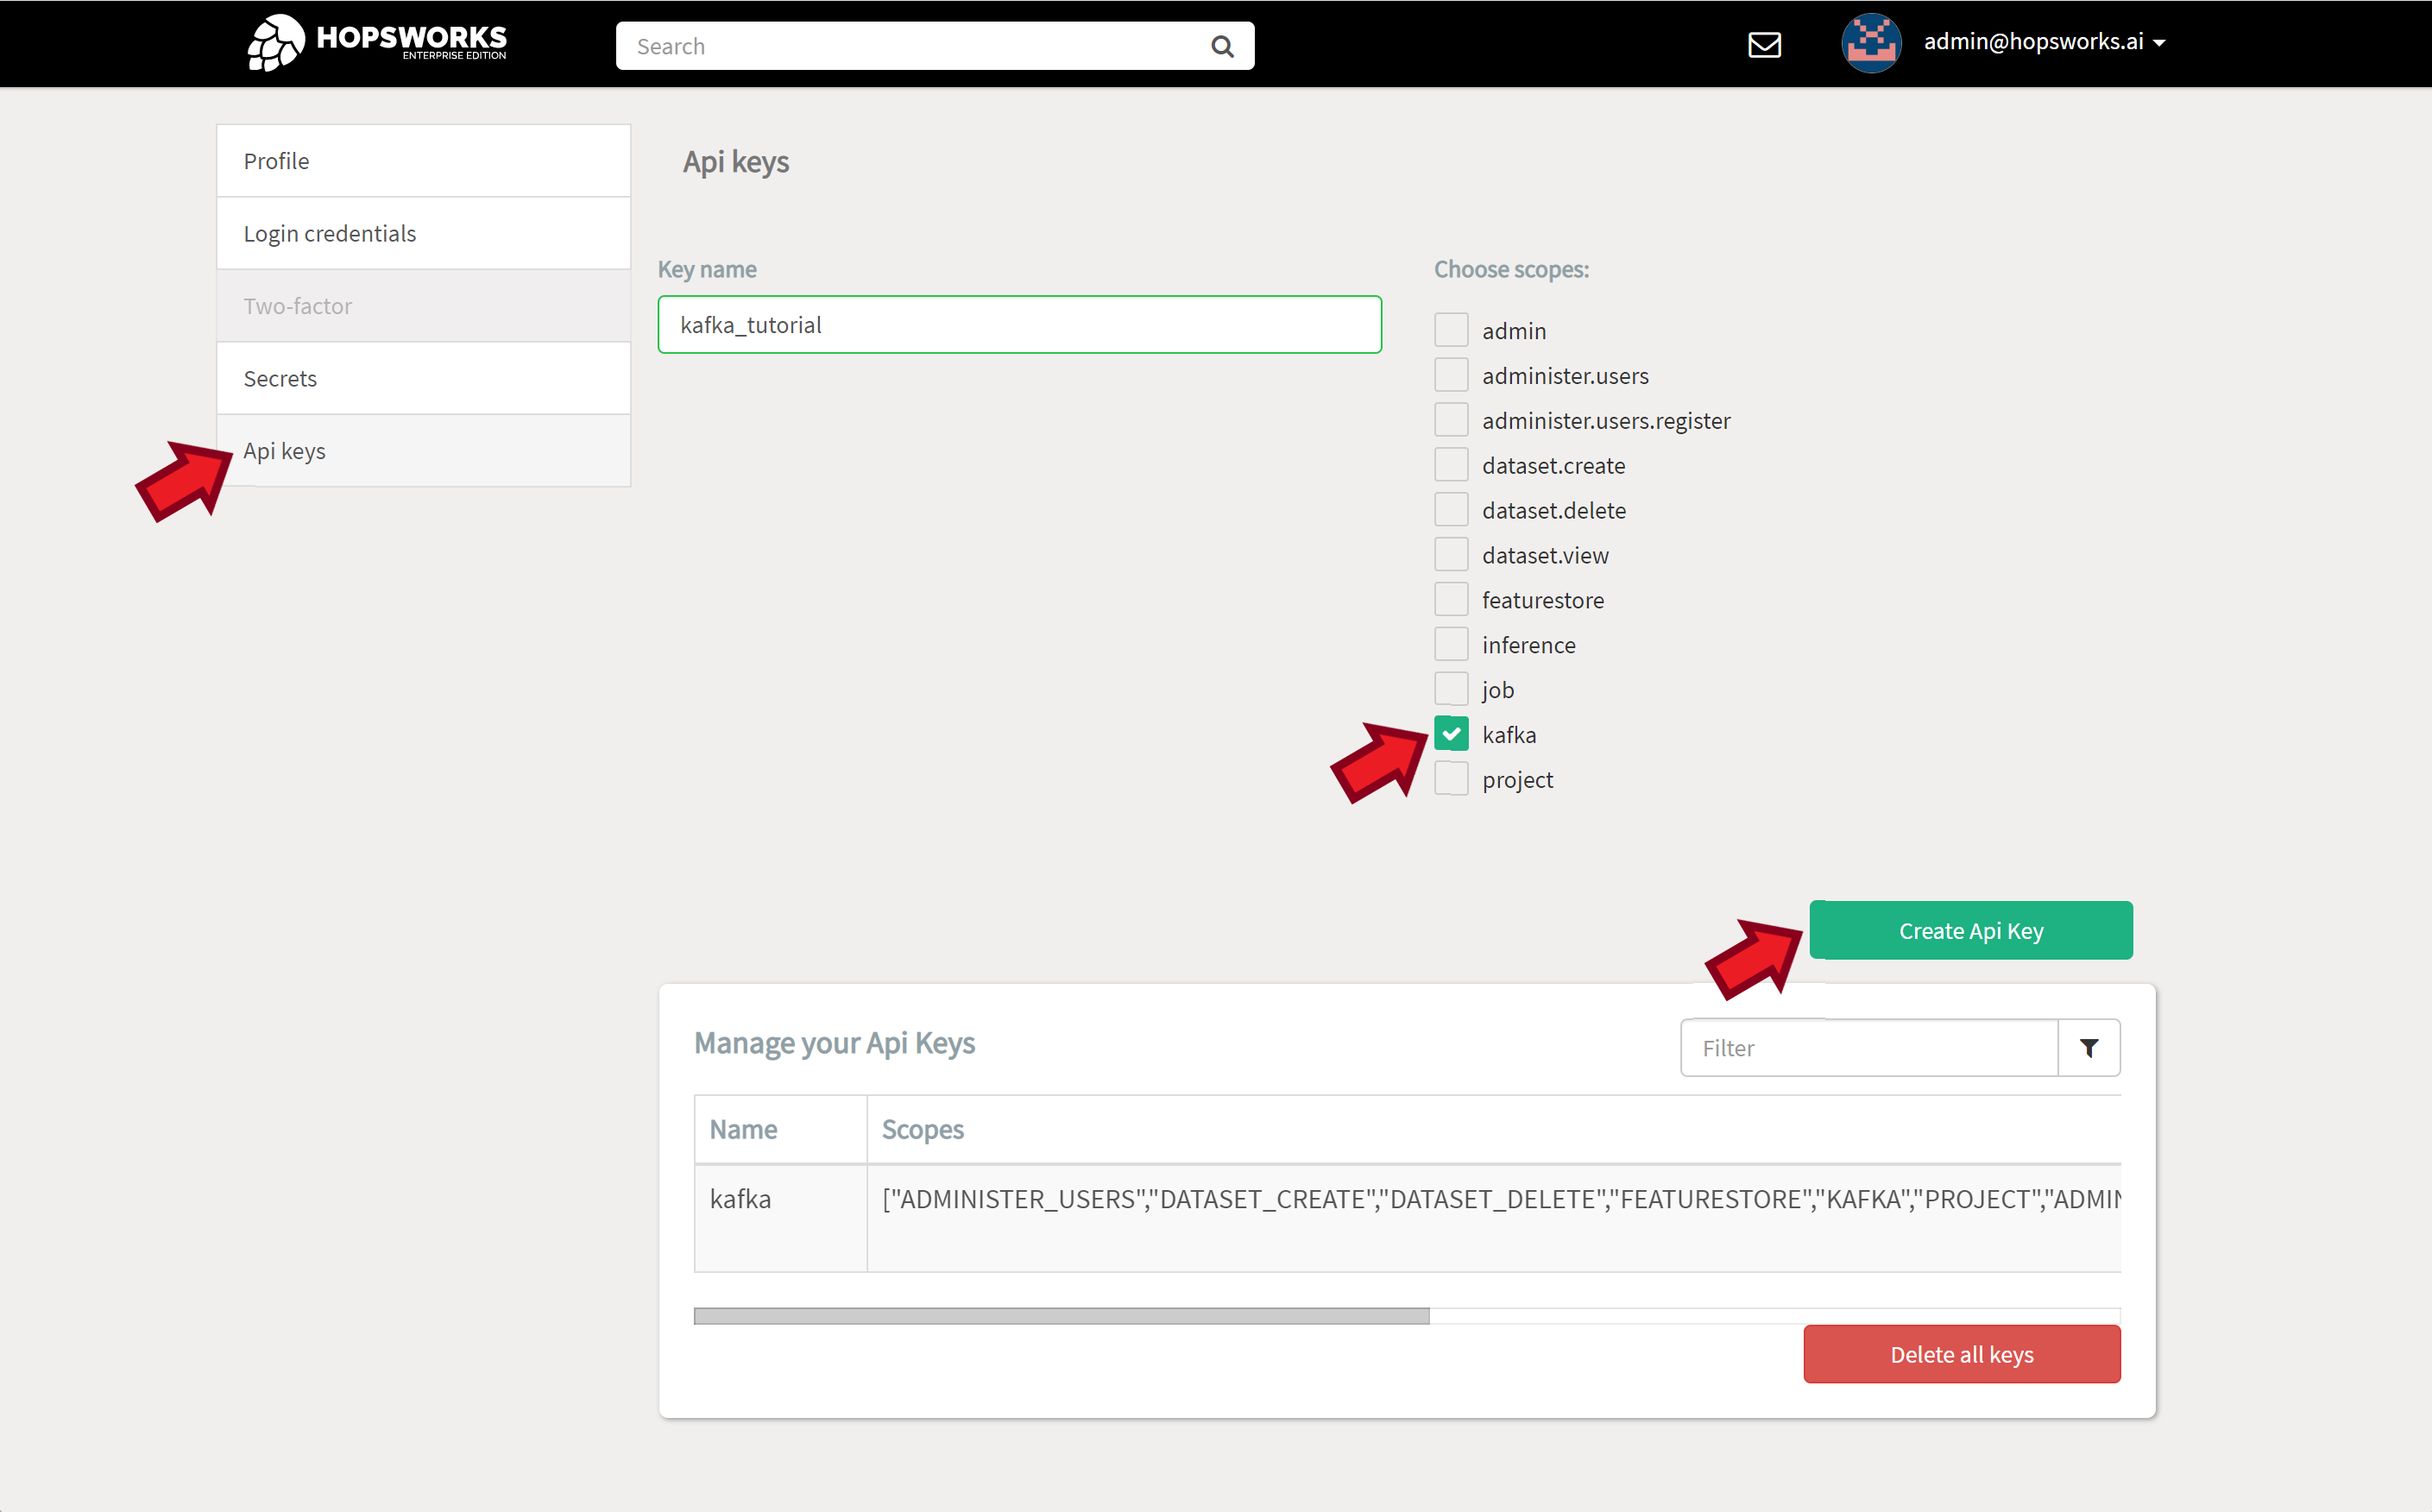
Select the API Keys tab. Give your key a name and select the services that the app using this key can access. Then click on Create API Key.

Account Settings - API Keys tab

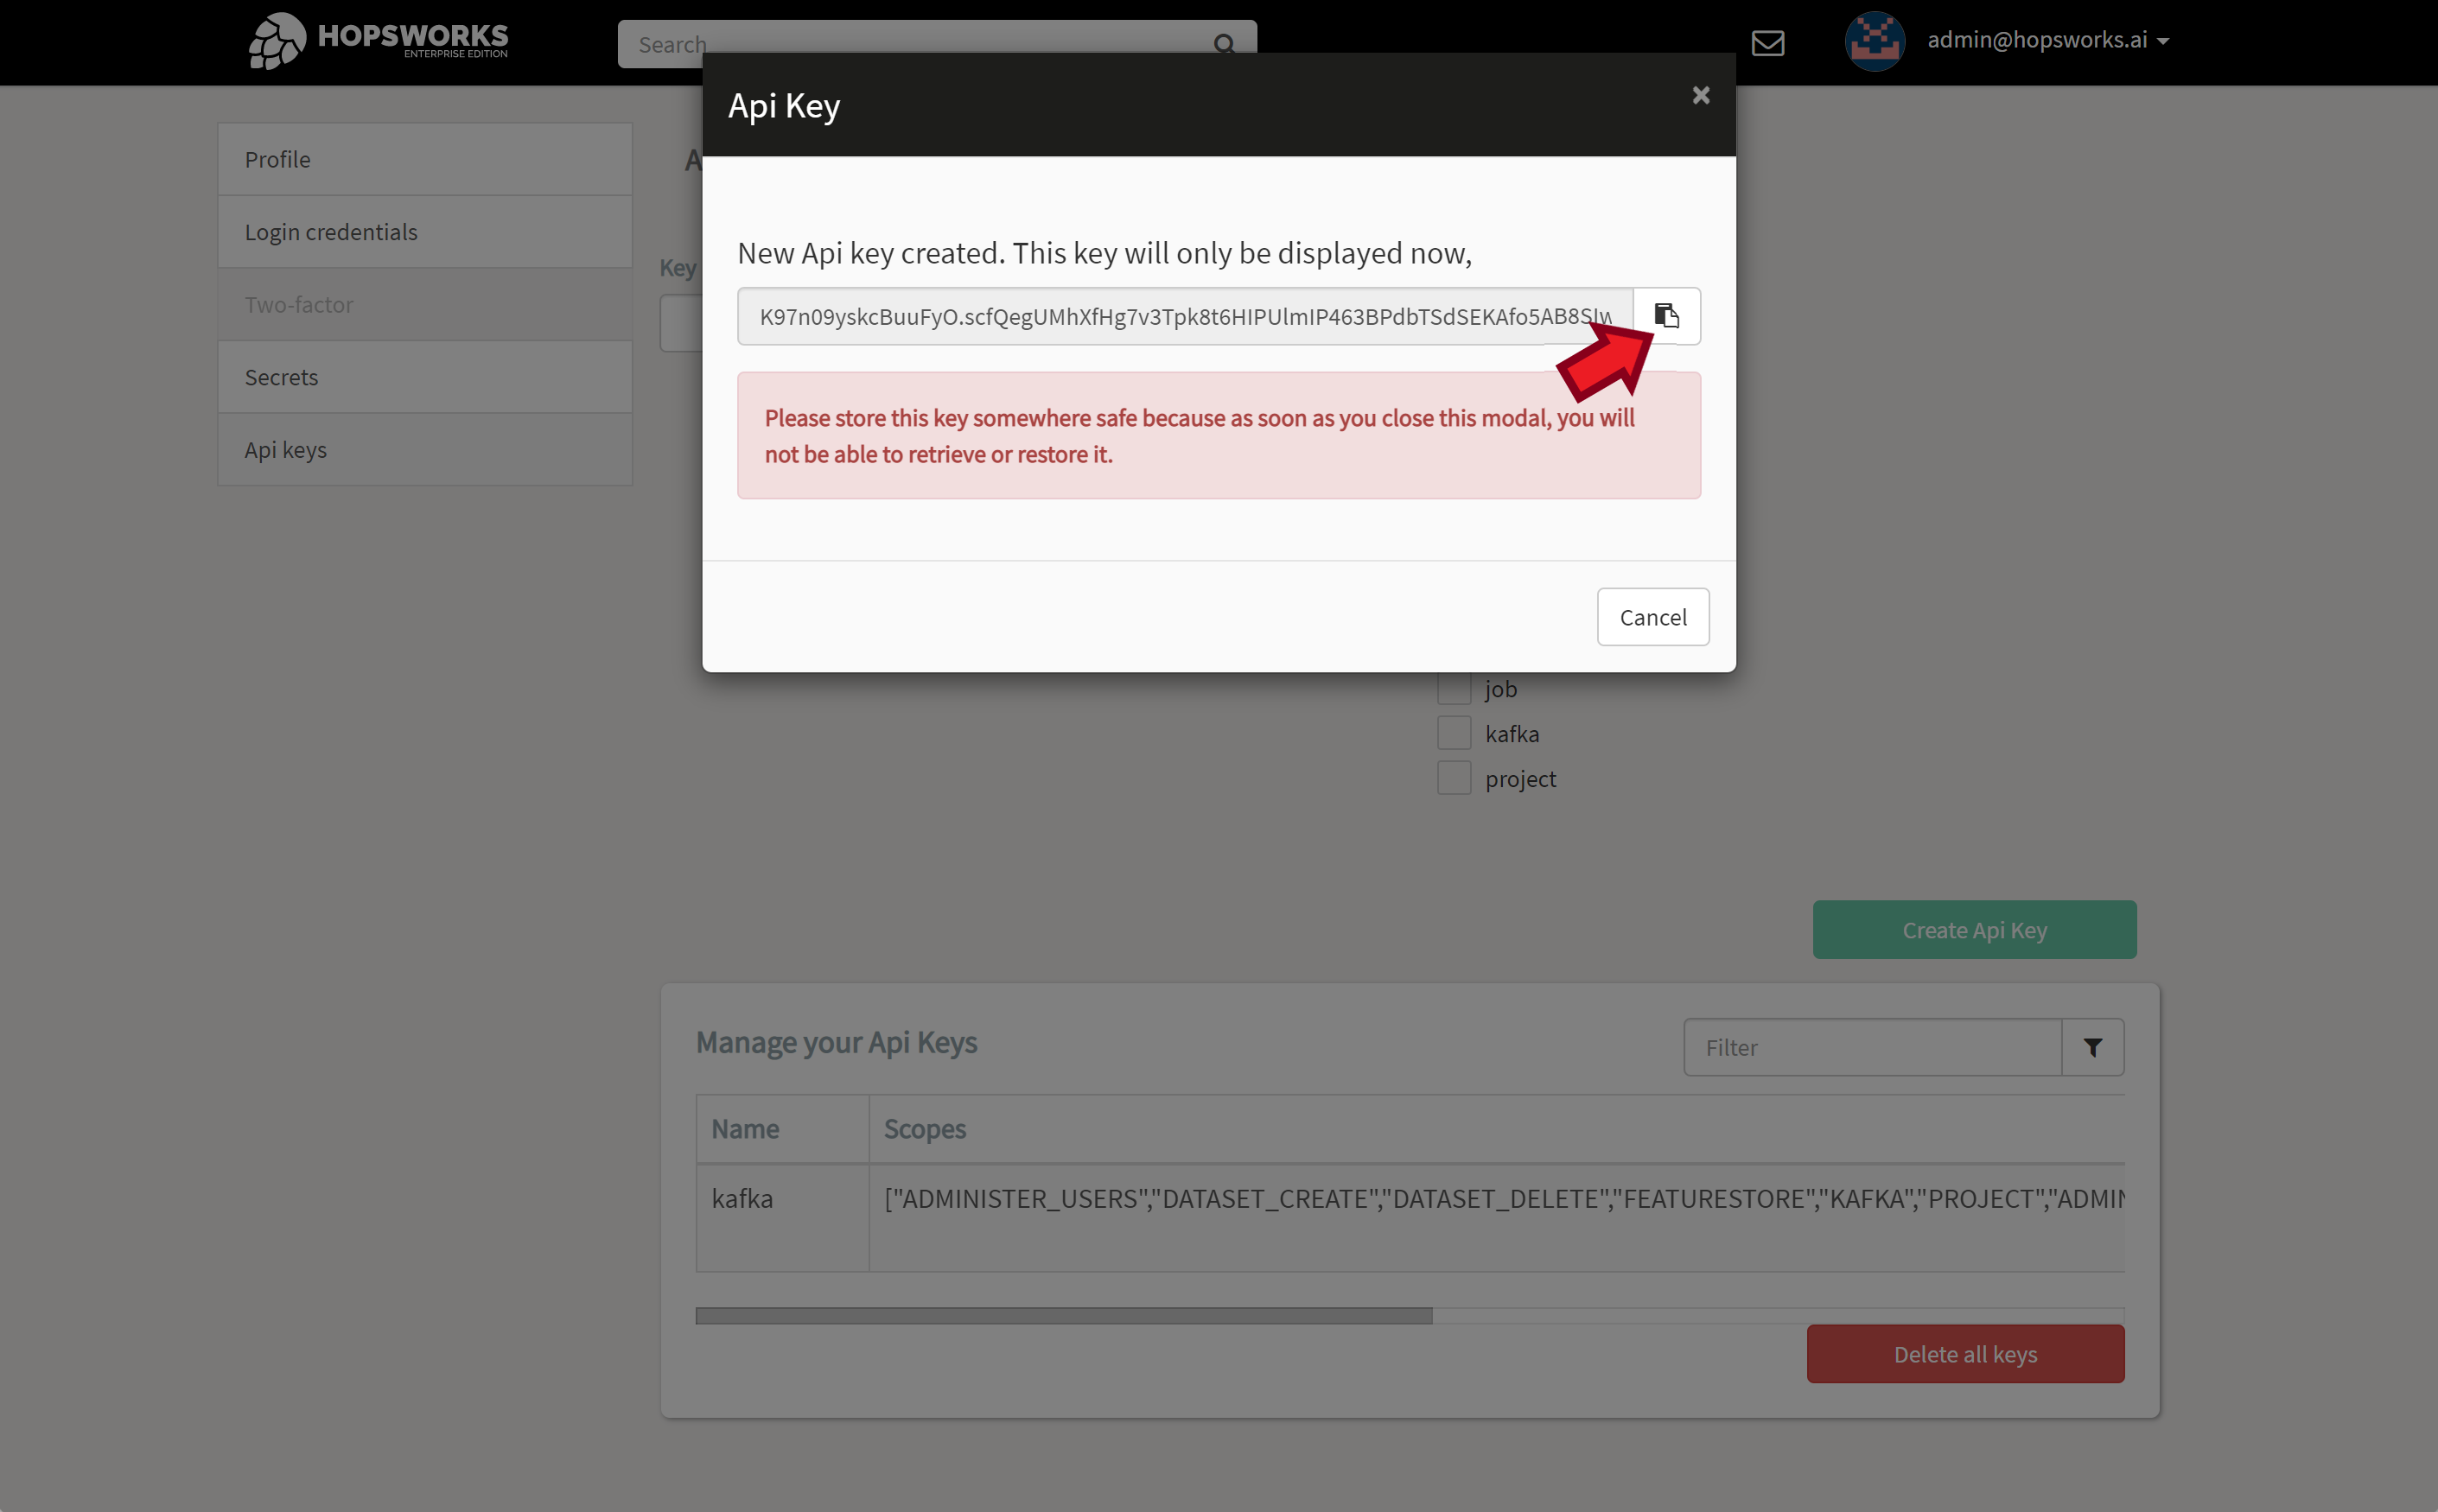
Copy and store your new key in a safe place as this is the only time it will be displayed. If you loose your API Key you’ll have to delete it and create a new one.

Your API Key will look something like this:

K97n09yskcBuuFyO.scfQegUMhXfHg7v3Tpk8t6HIPUlmIP463BPdbTSdSEKAfo5AB8SIwY8LGgB4924B

Important

Store your API Key in a text file (e.g., apiKeyFile) next to your certificates. We’ll use this file later to configure clients.
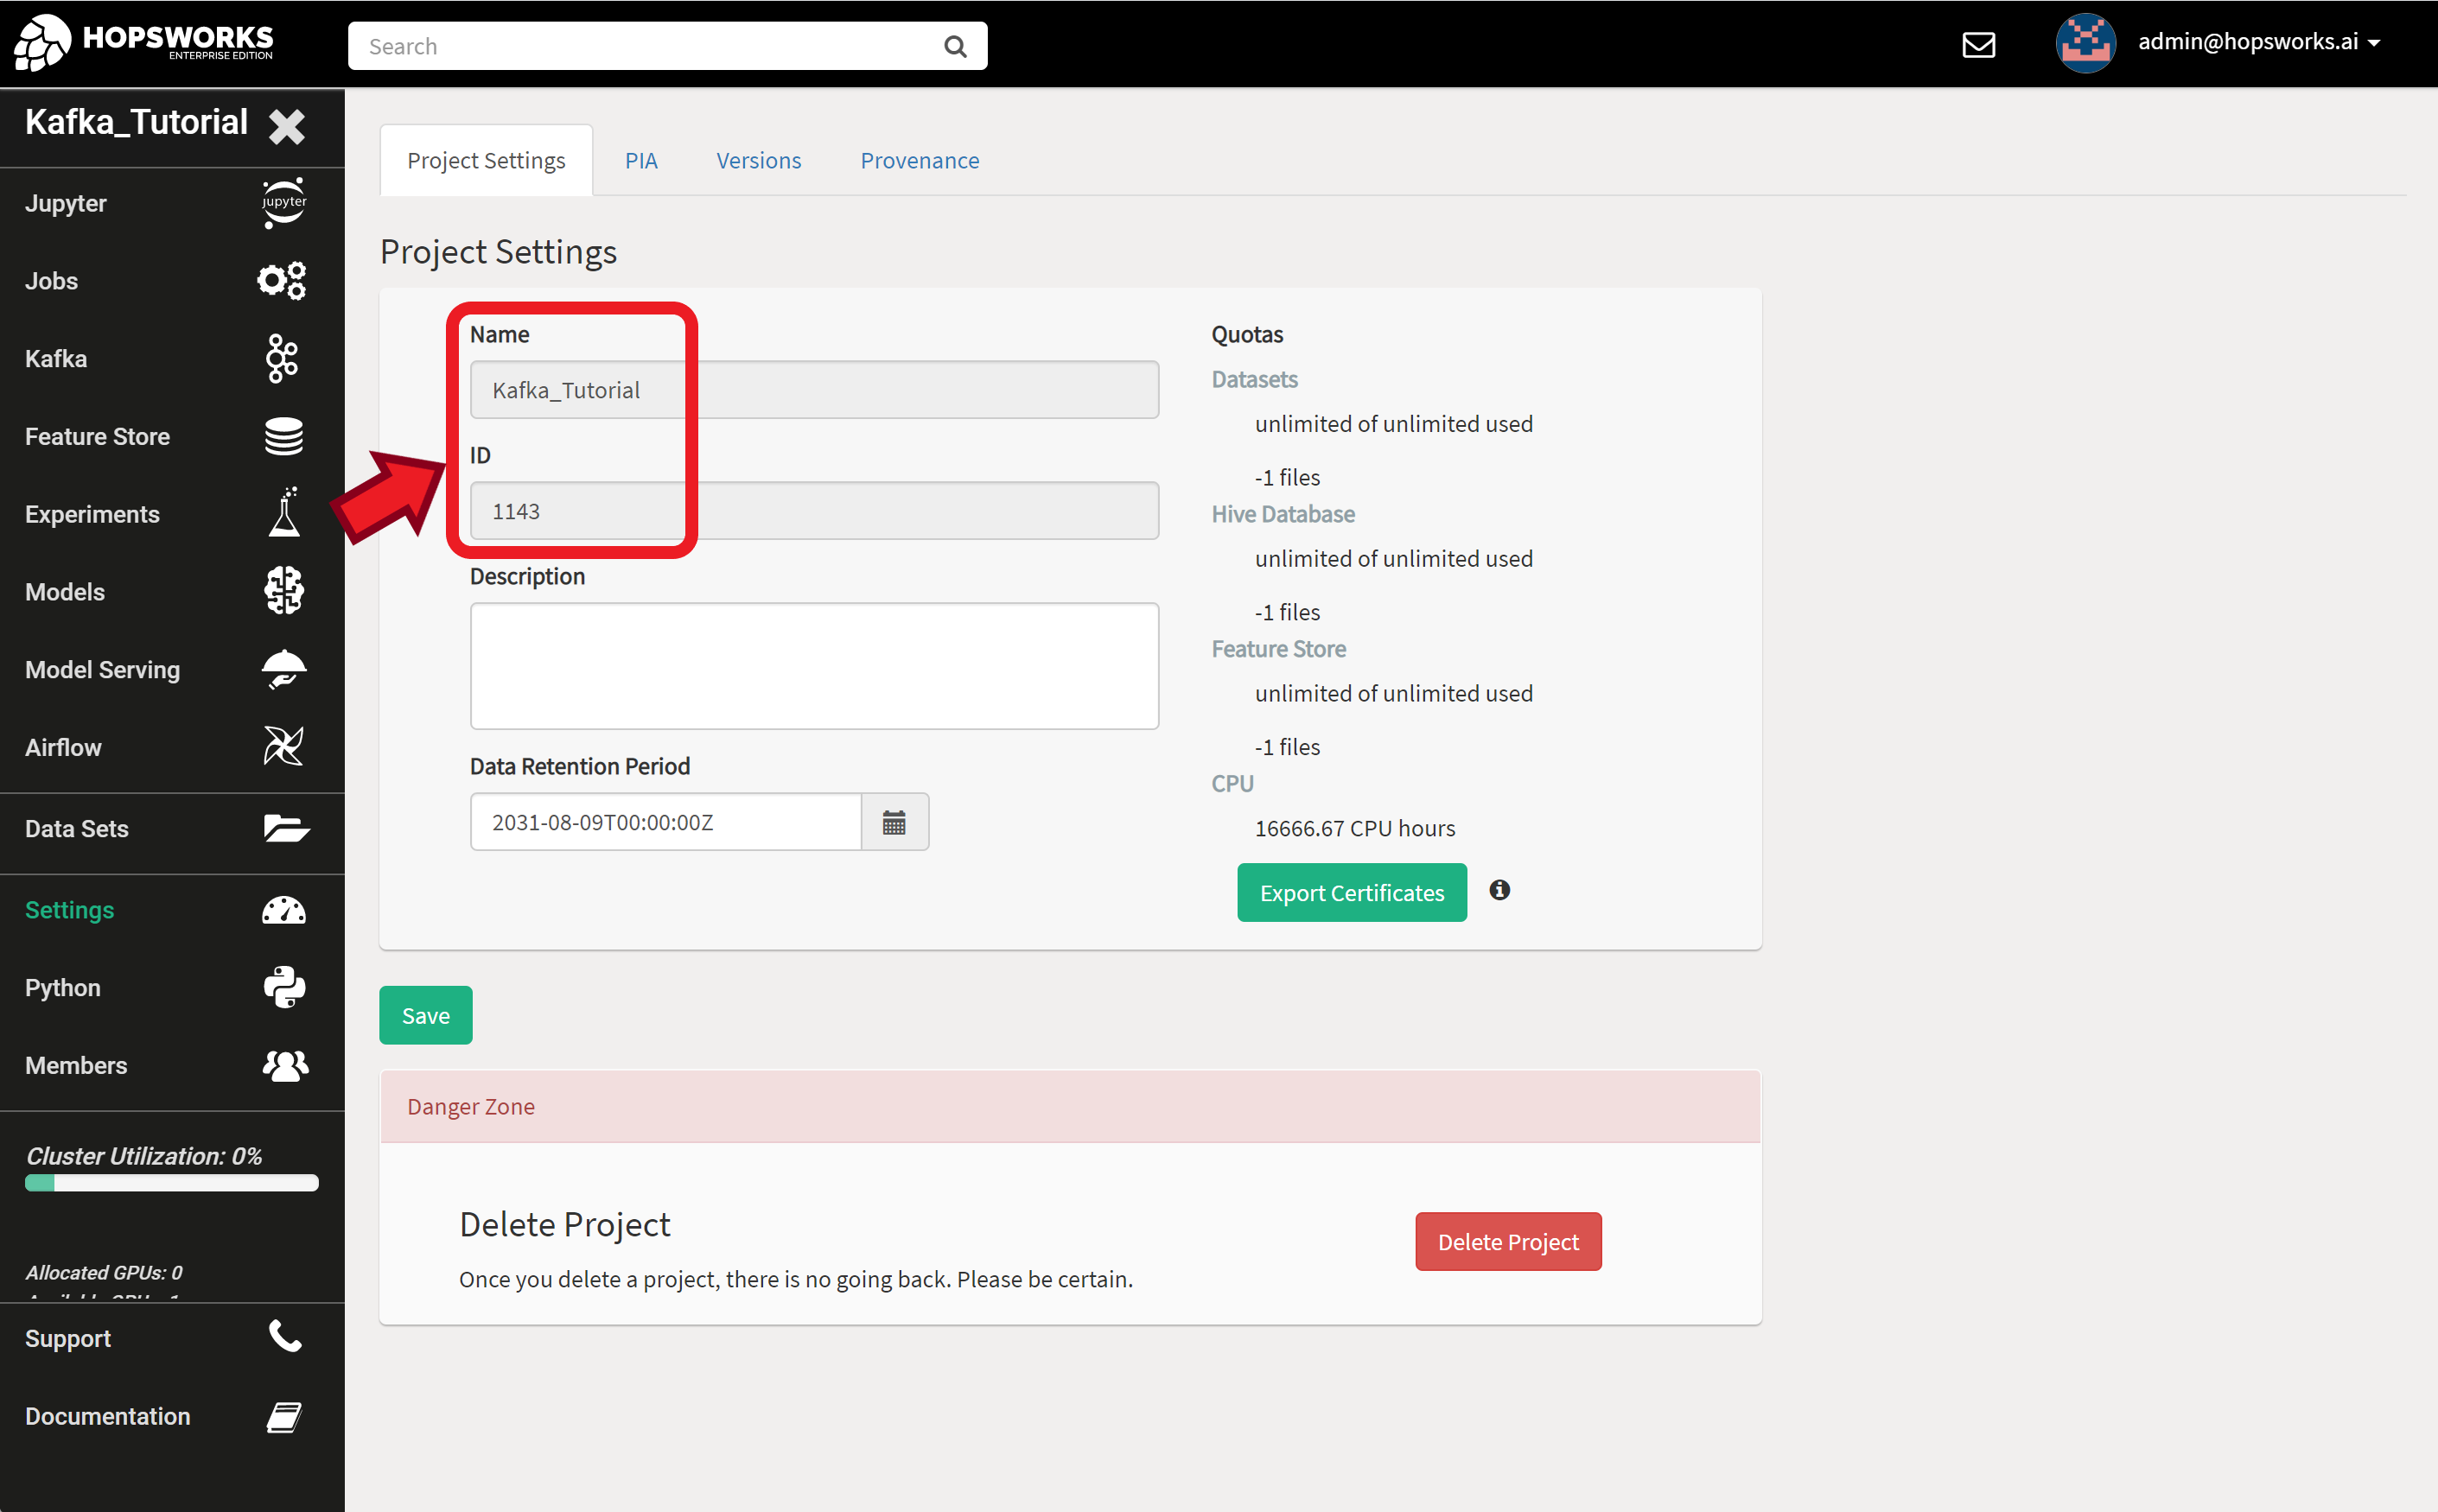
Creating an API Key

Project Name and ID

The final piece if information we need is the project name and ID. You will find this in your project settings tab.

Project Name and ID

Avro Client

Now we are ready for some coding. We’ll create a Kafka Producer and Consumer using the standard confluent-kafka library and connect it to a Hopsworks cluster. You can find the source code for all examples at Kafka Hopsworks Examples at GitHub.

You will need a working Python environment and the following packages:

pip install confluent_kafka requests fastavro toml

For plotting you might need the following packages depending on your environment:

pip install matplotlib
pip install pyqt5
sudo apt install qt5-default

Configuration File

We’ll write down all the parameters we prepared in the previous section in a configuration file. This makes it easier to change and also to switch between multiple projects or deployments by switching configuration files.

Go through the parameters and change them accordingly to match your project settings. Then save it as config.toml

[hops]
url = '127.0.0.1'

# for testing only! set this flag to false or path to server certificate file
# needed when testing Hopsworks with a self signed certificate
# otherwise leave this true
verify = false

[project]
name =  'Kafka_Tutorial'
id = '1143'
ca_file = 'cert/trustStore.pem'
certificate_file = 'cert/keyStore.pem'
key_file = 'cert/keyStore.pem'
key_password = 'asdf123'

[kafka]
topic = 'temperature'
schema = 'sensor'
port = '9092'

[kafka.consumer]
group_id = 'TutorialGroup'
auto_offset_reset =  'earliest'

[api]
base = '/hopsworks-api/api'
key = 'K97n09yskcBuuFyO.scfQegUMhXfHg7v3Tpk8t6HIPUlmIP463BPdbTSdSEKAfo5AB8SIwY8LGgB4924B'
key_file = 'cert/apiKeyFile'

Sensor Data

We’ll need some data to test our example. For that we’ll generate a time series with trend, seasonality, and noise. The code can emulate multiple sensors. The generated data looks like the plot below.

Sensor Data Sample

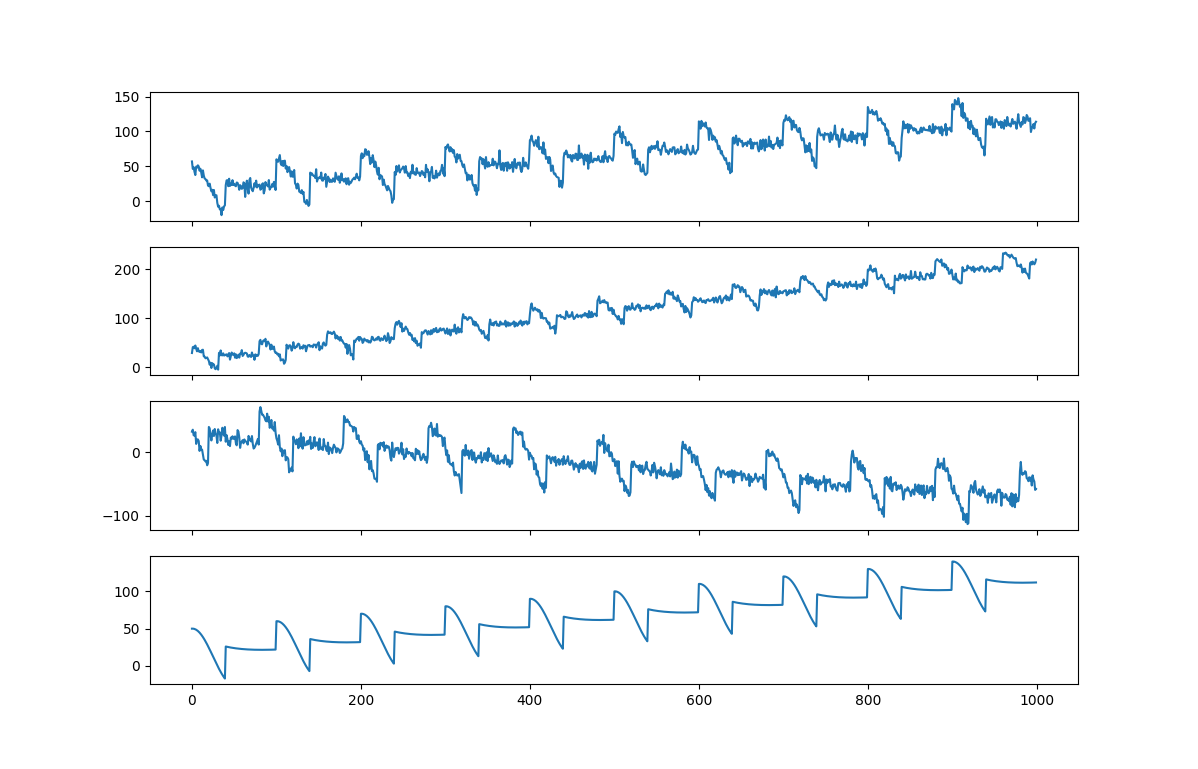
The code below for sensor.py generates the data. The code was inspired by this example. You can test it yourself by executing the file.

$ python sensor.py
# Generates a time series with trend, seasonality, and noise.
# Inspired by code from https://github.com/tensorflow/examples/blob/master/courses/udacity_intro_to_tensorflow_for_deep_learning/l08c01_common_patterns.ipynb

from collections import deque
import math
import random
import matplotlib.pyplot as plt


def trend(time, slope=0):
    return slope * time


def seasonal_pattern(season_time):
    """Just an arbitrary pattern, you can change it if you wish"""
    if season_time < 0.4:
        return math.cos(season_time * 2 * math.pi)
    else:
        return 1 / math.exp(3 * season_time)


def seasonality(time, period, amplitude=1, phase=0):
    """Repeats the same pattern at each period"""
    season_time = ((time + phase) % period) / period
    return amplitude * seasonal_pattern(season_time)


def white_noise(time, noise_level=1, seed=None):
    random.seed(seed)
    return random.normalvariate(0, 1) * noise_level


# Combines the above functions to emulate a sensor.
# Uses Python generator function
def sensor(baseline=0, slope=0, period=20, amplitude=20, phase=0, noise_level=1, start=0, end=-1):
    time = start
    while(time < end or end < 0):
        yield baseline + trend(time, slope) \
            + seasonality(time, period, amplitude, phase) \
            + white_noise(time, noise_level)
        time += 1


if __name__ == '__main__':

    # initialize a number of sensors
    sensors = [
        sensor(baseline=10, slope=0.1,  period=100, amplitude=40, noise_level=5, end=1000),
        sensor(baseline=10, slope=0.2,  period=80,  amplitude=30, noise_level=4, end=1000),
        sensor(baseline=20, slope=-0.1, period=100, amplitude=50, noise_level=6, phase=20, end=1000),
        sensor(baseline=10, slope=0.1,  period=100, amplitude=40, noise_level=0, end=1000),
        ]

    # a list of buffers to emulate receving data
    data_buffer = [deque() for x in range(len(sensors))]

    fig, ax = plt.subplots(len(sensors), sharex=True)
    lines = [a.plot([])[0] for a in ax]
    plt.show(block=False)

    for events in zip(*sensors):
        for e, b, l, a in zip(events, data_buffer, lines, ax):
            b.append(e)
            l.set_data(range(len(b)), b)
            a.set_xlim(0, len(b)+10)
            a.set_ylim(min(b)-10, max(b)+10)
        fig.canvas.draw()
        fig.canvas.flush_events()

    # pause execution so you can examin the figure
    input("Press Enter to continue...")

Avro Producer

With all preparation work out of the way, we are now ready to securely send sensor events into our HopsWorks Kafka topic. Below is the code for the avro_producer.py.

The code starts by defining an “Event“ class. This is the class for the objects we want to push into Kafka. You can change this class to match your application. The “event_to_dict“ is a helper function that returns a dictionary representation of an event object to be used by the Avro serializer. Note that the key names should match the field names defined in the schema and also the value types should match those in the schema.

The “main()“ function loads the configuration file and initializes the schema registry client, Avro serializer, and the producer. Then initializes a number of sensors to generate data and finally uses the producer to push the generated data into Kafka.

# This is a simple example of the SerializingProducer using Avro.
#

from confluent_kafka import SerializingProducer
from confluent_kafka.serialization import StringSerializer
from confluent_kafka.schema_registry import SchemaRegistryClient
from confluent_kafka.schema_registry.avro import AvroSerializer
from confluent_kafka.schema_registry import record_subject_name_strategy
from datetime import datetime
import toml
import argparse
from sensor import sensor
from time import sleep


class Event(object):
    """
    An object representing a sensor event

    Args:
        id (str): Sensor's id

        timestamp (datetime): timestamp in milliseconds

        value (double): Sensor's reading value

    """
    def __init__(self, id, timestamp, value):
        self.id = id
        self.timestamp = timestamp
        self.value = value


def event_to_dict(event, ctx):
    """
    Returns a dict representation of a sensor Event instance for serialization.

    Args:
        event (Event): Event instance.

        ctx (SerializationContext): Metadata pertaining to the serialization
            operation.

    Returns:
        dict: Dict populated with sensor event attributes to be serialized.

    """
    return dict(id=event.id,
                timestamp=datetime.timestamp(event.timestamp),
                value=event.value)


def delivery_report(err, msg):
    """
    Reports the failure or success of a message delivery.

    Args:
        err (KafkaError): The error that occurred on None on success.

        msg (Message): The message that was produced or failed.

    Note:
        In the delivery report callback the Message.key() and Message.value()
        will be the binary format as encoded by any configured Serializers and
        not the same object that was passed to produce().
        If you wish to pass the original object(s) for key and value to delivery
        report callback we recommend a bound callback or lambda where you pass
        the objects along.

    """
    if err is not None:
        print("Delivery failed for sensor Event {}: {}".format(msg.key(), err))
        return
    print('Sensor Event {} successfully produced to {} [{}] at offset {}'.format(
        msg.key(), msg.topic(), msg.partition(), msg.offset()))


def main():

    # Parse arguments
    parser = argparse.ArgumentParser(description='Produces time series data from emulated '
                                     'sensors into a kafka topic hosted at a HopsWorks cluster.')
    parser.add_argument("-c", "--config", default='config.toml',
                        help='Configuration file in toml format.')
    parser.add_argument("-t", "--time", default=0, type=int,
                        help='Start time step for the time series generator. Used to resume '
                        'generating the time series after stopping the program.')
    parser.add_argument("-e", "--events", default=1000, type=int,
                        help='Number of events to generate per sensor. Negative for infinite number.')
    parser.add_argument("-d", "--delay", default=0.5, type=float,
                        help='Delay between events in second. Can be float.')
    args = parser.parse_args()

    # Load HopsWorks Kafka configuration
    conf = toml.load(args.config)

    # Kafka schema that this program supports/expects
    # The schema will be checked against the schema of the Kafka topic
    schema_str = """
    {
      "type": "record",
      "name": "sensor",
      "fields": [
        {
          "name": "timestamp",
          "type": "long",
          "logicalType": "timestamp-millis"
        },
        {
          "name": "id",
          "type": "string"
        },
        {
          "name": "value",
          "type": "double"
        }
      ]
    }
    """

    # url for the schema registry in HopsWorks REST API services
    registry_url = 'https://' + conf['hops']['url']\
        + conf['api']['base'] + '/project/'+conf['project']['id']+'/kafka'

    # Initialise the Confluent schema registry client
    schema_registry_conf = {'url': registry_url, 'ssl.ca.location': conf['hops']['verify']}
    schema_registry_client = SchemaRegistryClient(schema_registry_conf)

    # Add the API key required by HopsWorks but not configurable through the confluent schema registry client
    headers={'Authorization': 'ApiKey ' + conf['api']['key']}
    schema_registry_client._rest_client.session.headers.update(headers)

    # Initialize the avro serializer for the value using the schema
    avro_serializer = AvroSerializer(schema_registry_client,
                                     schema_str,
                                     event_to_dict,
                                     {'auto.register.schemas': False, 'subject.name.strategy': record_subject_name_strategy})

    # Initialize a simple String serializer for the key
    string_serializer = StringSerializer('utf_8')

    # Initialize the producer
    producer_conf = {'bootstrap.servers': conf['hops']['url']+':'+conf['kafka']['port'],
                     'security.protocol': 'SSL',
                     'ssl.ca.location': conf['project']['ca_file'],
                     'ssl.certificate.location': conf['project']['certificate_file'],
                     'ssl.key.location': conf['project']['key_file'],
                     'ssl.key.password': conf['project']['key_password'],
                     'key.serializer': string_serializer,
                     'value.serializer': avro_serializer}
    producer = SerializingProducer(producer_conf)

    # Initialize a number of sensors
    start = args.time
    end = start + args.events if args.events > 0 else -1
    sensors = [
        sensor(baseline=10,  slope=0.1,   period=100, amplitude=40, noise_level=5, start=start, end=end),
        sensor(baseline=10,  slope=0.2,   period=50,  amplitude=30, noise_level=4, start=start, end=end),
        sensor(baseline=20,  slope=-0.1,  period=100, amplitude=50, noise_level=6, phase=20, start=start, end=end),
        sensor(baseline=10,  slope=0.1,   period=100, amplitude=40, noise_level=0, start=start, end=end),
        sensor(baseline=30,  slope=-0.1,  period=100, amplitude=40, noise_level=5, start=start, end=end),
        sensor(baseline=40,  slope=0,     period=200, amplitude=10, noise_level=4, start=start, end=end),
        sensor(baseline=0,   slope=0.3,   period=100, amplitude=20, noise_level=6, phase=50, start=start, end=end),
        sensor(baseline=-10, slope=0.1,   period=100, amplitude=40, noise_level=9, start=start, end=end),
        ]

    # Start producing events
    print("Producing sensor events to topic {}.".format(conf['kafka']['topic']))
    print('Press Ctrl-c to exit.')
    time_step = start     # a counter for the number of time steps generated
    try:
        for data in zip(*sensors):
            timestamp = datetime.now()
            time_step += 1
            for i, d in enumerate(data):
                # Serve on_delivery callbacks from previous calls to produce()
                producer.poll(0.0)
                try:
                    event = Event(id='sensor'+str(i),
                                  timestamp=timestamp,
                                  value=d)
                    producer.produce(topic=conf['kafka']['topic'], key=event.id, value=event,
                                     on_delivery=delivery_report)
                except KeyboardInterrupt:
                    break
                except ValueError:
                    print("Invalid input, discarding record...")
                    continue
            sleep(args.delay)
    except KeyboardInterrupt:
        print('\nStopping...')

    print("Flushing records...")
    producer.flush()
    print('To continue execution start from event {}'.format(time_step))


if __name__ == '__main__':
    main()

The program takes a number of optional command line arguments to control the execution. You can specify the location of the configuration file using the -c flag. You can use -e to control the number of events generated per sensor and -d for the delay between events per sensor. The -t flag is used to resume the generation of the time series from the specified time step. This is useful if you want to continue generating more events after the program finishes or stopped.

python avro_producer.py --help
$ python avro_producer.py --help
usage: avro_producer.py [-h] [-c CONFIG] [-t TIME] [-e EVENTS] [-d DELAY]

Produces time series data from emulated sensors into a kafka topic hosted at a HopsWorks cluster.

optional arguments:
  -h, --help            show this help message and exit
  -c CONFIG, --config CONFIG
                        Configuration file in toml format.
  -t TIME, --time TIME  Start time step for the time series generator. Used to resume generating
                        the time series after stopping the program.
  -e EVENTS, --events EVENTS
                        Number of events to generate per sensor. Negative for infinite number.
  -d DELAY, --delay DELAY
                        Delay between events in second. Can be float.

Warning

There is a bug in the HopsWorks REST API implementation for the schema registry that causes an HTTP error code 415 “Unsupported Media Type”.

The reason for this error is a mismatch of the content type sent between the client and the server. The Confluent schema registry client is sending the correct type which is ‘application/vnd.schemaregistry.v1+json’. While the Hopsworks REST API server is expecting content of type ‘application/json’. The bug is reported to the HopsWorks team and is expected to be fixed in upcoming releases after v2.2.

The easiest workaround is to change the Confluent schema registry client to send content type ‘application/json’. This should be OK if you are using Python virtualenv as this change will not affect other applications.

Edit the file schema_registry_client.py in your local python install directory and search for the line with ‘Content-Type’ (line 165 in confluent-kafka v1.7.0) and change it to: 'Content-Type': "application/json"}.

The location of the file depends on your Python installation. If you are using virtualenv it will look something like: ~/.virtualenvs/myvenv/lib/python3.8/site-packages/confluent_kafka/schema_registry/schema_registry_client.py

Now let's generate some events. Below is a sample execution of 5 events with 0.5 seconds delay:

python avro_producer.py -e 5 -d 0.5
$ python avro_producer.py -e 5 -d 0.5
Producing sensor events to topic temperature.
Press Ctrl-c to exit.
Sensor Event b'sensor0' successfully produced to temperature [0] at offset 0
Sensor Event b'sensor1' successfully produced to temperature [0] at offset 1
Sensor Event b'sensor2' successfully produced to temperature [0] at offset 2
Sensor Event b'sensor3' successfully produced to temperature [0] at offset 3
Sensor Event b'sensor0' successfully produced to temperature [0] at offset 4
Sensor Event b'sensor1' successfully produced to temperature [0] at offset 5
Sensor Event b'sensor2' successfully produced to temperature [0] at offset 6
Sensor Event b'sensor3' successfully produced to temperature [0] at offset 7
Sensor Event b'sensor4' successfully produced to temperature [1] at offset 0
Sensor Event b'sensor5' successfully produced to temperature [1] at offset 1
Sensor Event b'sensor6' successfully produced to temperature [1] at offset 2
Sensor Event b'sensor7' successfully produced to temperature [1] at offset 3
Sensor Event b'sensor4' successfully produced to temperature [1] at offset 4
Sensor Event b'sensor5' successfully produced to temperature [1] at offset 5
Sensor Event b'sensor6' successfully produced to temperature [1] at offset 6
Sensor Event b'sensor7' successfully produced to temperature [1] at offset 7
Sensor Event b'sensor0' successfully produced to temperature [0] at offset 8
Sensor Event b'sensor1' successfully produced to temperature [0] at offset 9
Sensor Event b'sensor2' successfully produced to temperature [0] at offset 10
Sensor Event b'sensor3' successfully produced to temperature [0] at offset 11
Sensor Event b'sensor4' successfully produced to temperature [1] at offset 8
Sensor Event b'sensor5' successfully produced to temperature [1] at offset 9
Sensor Event b'sensor6' successfully produced to temperature [1] at offset 10
Sensor Event b'sensor7' successfully produced to temperature [1] at offset 11
Sensor Event b'sensor4' successfully produced to temperature [1] at offset 12
Sensor Event b'sensor5' successfully produced to temperature [1] at offset 13
Sensor Event b'sensor6' successfully produced to temperature [1] at offset 14
Sensor Event b'sensor7' successfully produced to temperature [1] at offset 15
Sensor Event b'sensor0' successfully produced to temperature [0] at offset 12
Sensor Event b'sensor1' successfully produced to temperature [0] at offset 13
Sensor Event b'sensor2' successfully produced to temperature [0] at offset 14
Sensor Event b'sensor3' successfully produced to temperature [0] at offset 15
Flushing records...
Sensor Event b'sensor4' successfully produced to temperature [1] at offset 16
Sensor Event b'sensor5' successfully produced to temperature [1] at offset 17
Sensor Event b'sensor6' successfully produced to temperature [1] at offset 18
Sensor Event b'sensor7' successfully produced to temperature [1] at offset 19
Sensor Event b'sensor0' successfully produced to temperature [0] at offset 16
Sensor Event b'sensor1' successfully produced to temperature [0] at offset 17
Sensor Event b'sensor2' successfully produced to temperature [0] at offset 18
Sensor Event b'sensor3' successfully produced to temperature [0] at offset 19
To continue execution start from event 5

Let’s generate some more events. Notice the last line in the execution above. It prints the time step that should be used to continue execution. To do that, we add -t 5 to the command:

python avro_producer.py -e 5 -d 0.5 -t 5
$ python avro_producer.py -e 5 -d 0.5 -t 5
Producing sensor events to topic temperature.
Press Ctrl-c to exit.
Sensor Event b'sensor0' successfully produced to temperature [0] at offset 20
Sensor Event b'sensor1' successfully produced to temperature [0] at offset 21
Sensor Event b'sensor2' successfully produced to temperature [0] at offset 22
Sensor Event b'sensor3' successfully produced to temperature [0] at offset 23
Sensor Event b'sensor0' successfully produced to temperature [0] at offset 24
Sensor Event b'sensor1' successfully produced to temperature [0] at offset 25
Sensor Event b'sensor2' successfully produced to temperature [0] at offset 26
Sensor Event b'sensor3' successfully produced to temperature [0] at offset 27
Sensor Event b'sensor4' successfully produced to temperature [1] at offset 20
Sensor Event b'sensor5' successfully produced to temperature [1] at offset 21
Sensor Event b'sensor6' successfully produced to temperature [1] at offset 22
Sensor Event b'sensor7' successfully produced to temperature [1] at offset 23
Sensor Event b'sensor4' successfully produced to temperature [1] at offset 24
Sensor Event b'sensor5' successfully produced to temperature [1] at offset 25
Sensor Event b'sensor6' successfully produced to temperature [1] at offset 26
Sensor Event b'sensor7' successfully produced to temperature [1] at offset 27
Sensor Event b'sensor4' successfully produced to temperature [1] at offset 28
Sensor Event b'sensor5' successfully produced to temperature [1] at offset 29
Sensor Event b'sensor6' successfully produced to temperature [1] at offset 30
Sensor Event b'sensor7' successfully produced to temperature [1] at offset 31
Sensor Event b'sensor0' successfully produced to temperature [0] at offset 28
Sensor Event b'sensor1' successfully produced to temperature [0] at offset 29
Sensor Event b'sensor2' successfully produced to temperature [0] at offset 30
Sensor Event b'sensor3' successfully produced to temperature [0] at offset 31
Sensor Event b'sensor0' successfully produced to temperature [0] at offset 32
Sensor Event b'sensor1' successfully produced to temperature [0] at offset 33
Sensor Event b'sensor2' successfully produced to temperature [0] at offset 34
Sensor Event b'sensor3' successfully produced to temperature [0] at offset 35
Sensor Event b'sensor4' successfully produced to temperature [1] at offset 32
Sensor Event b'sensor5' successfully produced to temperature [1] at offset 33
Sensor Event b'sensor6' successfully produced to temperature [1] at offset 34
Sensor Event b'sensor7' successfully produced to temperature [1] at offset 35
Flushing records...
Sensor Event b'sensor0' successfully produced to temperature [0] at offset 36
Sensor Event b'sensor1' successfully produced to temperature [0] at offset 37
Sensor Event b'sensor2' successfully produced to temperature [0] at offset 38
Sensor Event b'sensor3' successfully produced to temperature [0] at offset 39
Sensor Event b'sensor4' successfully produced to temperature [1] at offset 36
Sensor Event b'sensor5' successfully produced to temperature [1] at offset 37
Sensor Event b'sensor6' successfully produced to temperature [1] at offset 38
Sensor Event b'sensor7' successfully produced to temperature [1] at offset 39
To continue execution start from event 10

Note

Remember that when we created the ‘temperature’ topic we set the number of partitions to two. In the output sample the partition number is shown in the square brackets after the topic name. For example ‘temperature [0]’. This means that the event was successfully sent to the temperature topic at partition 0.

Notice that events from the same sensor (e.g., sensor5) always ends up in the same partition (partition [1] in case of sensor5). This is enforced by Kafka to guarantee the ordered processing of events per event source. This is implemented using the key of the produced event which in our case is the sensor id. So pay attention to what you choose as the key depending on the application.

Avro Consumer

The Avro consumer code is similar to the producer code in previous section. It starts with the “Event“ class which is the same as the one in the producer code. The rest is similar but works in the other direction. So now we have a “dict_to_event“ helper function that will return an event object and in the “main()“ function we’ll initialize an Avro deserializer and a consumer. Finally the code loops to poll messages and plot the values.

# This is a simple example of the SerializingProducer using Avro.
#

from confluent_kafka import DeserializingConsumer
from confluent_kafka.schema_registry import SchemaRegistryClient
from confluent_kafka.schema_registry.avro import AvroDeserializer
from confluent_kafka.serialization import StringDeserializer
from confluent_kafka.schema_registry import record_subject_name_strategy
from datetime import datetime, timedelta
import toml
import argparse
from collections import deque
import matplotlib.pyplot as plt

class Event(object):
    """
    An object representing a sensor event

    Args:
        id (str): Sensor's id

        timestamp (datetime): timestamp in milliseconds

        value (double): Sensor's reading value

    """
    def __init__(self, id, timestamp, value):
        self.id = id
        self.timestamp = timestamp
        self.value = value


def dict_to_event(obj, ctx):
    """
    Converts object literal(dict) to an Event instance.

    Args:
        obj (dict): Object literal(dict)

        ctx (SerializationContext): Metadata pertaining to the serialization
            operation.

    """
    if obj is None:
        return None

    return Event(id=obj['id'],
                timestamp=datetime.fromtimestamp(obj['timestamp']),
                value=obj['value'])


def main():
    # Parse arguments
    parser = argparse.ArgumentParser(description='Consumes events from kafka topic hosted at a HopsWorks cluster.')
    parser.add_argument("-c", "--config", default='config.toml',
                        help='Configuration file in toml format.')
    parser.add_argument("-s", "--sensors", default=8, type=int,
                        help='The total number of sensors to visualize.')
    args = parser.parse_args()

    # Load HopsWorks Kafka configuration
    conf = toml.load(args.config)

    # Kafka schema that this program supports/expects
    # The schema will be checked against the schema of the Kafka topic
    schema_str = """
    {
      "type": "record",
      "name": "sensor",
      "fields": [
        {
          "name": "timestamp",
          "type": "long",
          "logicalType": "timestamp-millis"
        },
        {
          "name": "id",
          "type": "string"
        },
        {
          "name": "value",
          "type": "double"
        }
      ]
    }
    """

    # url for the schema registry in HopsWorks REST API services
    registry_url = 'https://' + conf['hops']['url']\
        + conf['api']['base'] + '/project/'+conf['project']['id']+'/kafka'

    # Initialise the Confluent schema registry client
    schema_registry_conf = {'url': registry_url, 'ssl.ca.location': conf['hops']['verify']}
    schema_registry_client = SchemaRegistryClient(schema_registry_conf)

    # Add the API key required by HopsWorks but not configurable through the confluent schema registry client
    headers={'Authorization': 'ApiKey ' + conf['api']['key']}
    schema_registry_client._rest_client.session.headers.update(headers)

    # Initialize the avro deserializer for the value using the schema
    avro_deserializer = AvroDeserializer(schema_registry_client,
                                         schema_str,
                                         dict_to_event)

    # Initialize a simple String deserializer for the key
    string_deserializer = StringDeserializer('utf_8')

    # Initialize the consumer
    consumer_conf = {'bootstrap.servers': conf['hops']['url']+':'+conf['kafka']['port'],
                     'security.protocol': 'SSL',
                     'ssl.ca.location': conf['project']['ca_file'],
                     'ssl.certificate.location': conf['project']['certificate_file'],
                     'ssl.key.location': conf['project']['key_file'],
                     'ssl.key.password': conf['project']['key_password'],
                     'key.deserializer': string_deserializer,
                     'value.deserializer': avro_deserializer,
                     'group.id': conf['kafka']['consumer']['group_id'],
                     'auto.offset.reset': conf['kafka']['consumer']['auto_offset_reset'],
                     }
    consumer = DeserializingConsumer(consumer_conf)
    # Subscribe to a topic
    consumer.subscribe([conf['kafka']['topic']])

    # a list of buffers to store data for plotting
    MAX_BUFFER = 1000 # max events to store for plotting, then graph will scroll
    buffer = [deque(maxlen=MAX_BUFFER) for x in range(args.sensors)]

    # Plotting
    fig, ax = plt.subplots(len(buffer), sharex=True)
    lines = [a.plot([])[0] for a in ax]
    plt.show(block=False)

    def plot():
        # x is shared, so set lim once
        ax[0].set_xlim(0, max(len(b) for b in buffer)+10)

        for b, l, a in zip(buffer, lines, ax):
            if len(b) == 0:
                continue
            l.set_data(range(len(b)), b)
            a.set_ylim(min(b)-10, max(b)+10)
        fig.canvas.draw()
        fig.canvas.flush_events()

    # loop for consuming events
    time = datetime.now()         # time for replotting every delta seconds
    delta = timedelta(seconds=0.5)
    while True:
        try:
            # plot
            if datetime.now() - time > delta:
                time = datetime.now()
                plot()

            # SIGINT can't be handled when polling, limit timeout to 1 second.
            msg = consumer.poll(1.0)
            if msg is None:
                continue

            event = msg.value()
            if event is not None:
                print("Event record {}: id: {}\n"
                      "\ttimestamp: {}\n"
                      "\tvalue: {}\n"
                      .format(msg.key(), event.id,
                              event.timestamp,
                              event.value))
                # store event in buffer for plotting
                id = int(event.id[6:])
                buffer[id].append(event.value)

        except KeyboardInterrupt:
            break

    consumer.close()


if __name__ == '__main__':
    main()

Run avro_consumer.py with the command below. It will start receiving and plotting the 10 events we produced in the previous example. After that the program will wait for more events. Keep it running as we’ll be producing more events soon.

Note

The consumer received the 10 events we generated in the previous section because we set the auto.offset.reset property to 'earliest' in our configuration file. This causes a consumer group, when first created, to get all available events in the Kafka topic. Another option is 'latest' which will cause the consumer group to get only the current events ignoring old ones. Read more about consumer groups and offset management here.

$ python avro_consumer.py

Keep the avro_producer.py running and try generating 20 more events with the command below.

$ python avro_producer.py -e 20 -d 0.5 -t 10

The producer will start producing more events and you will see the consumer receiving and plotting them. The output should be similar to the figure below.

Kafka example with one consumer

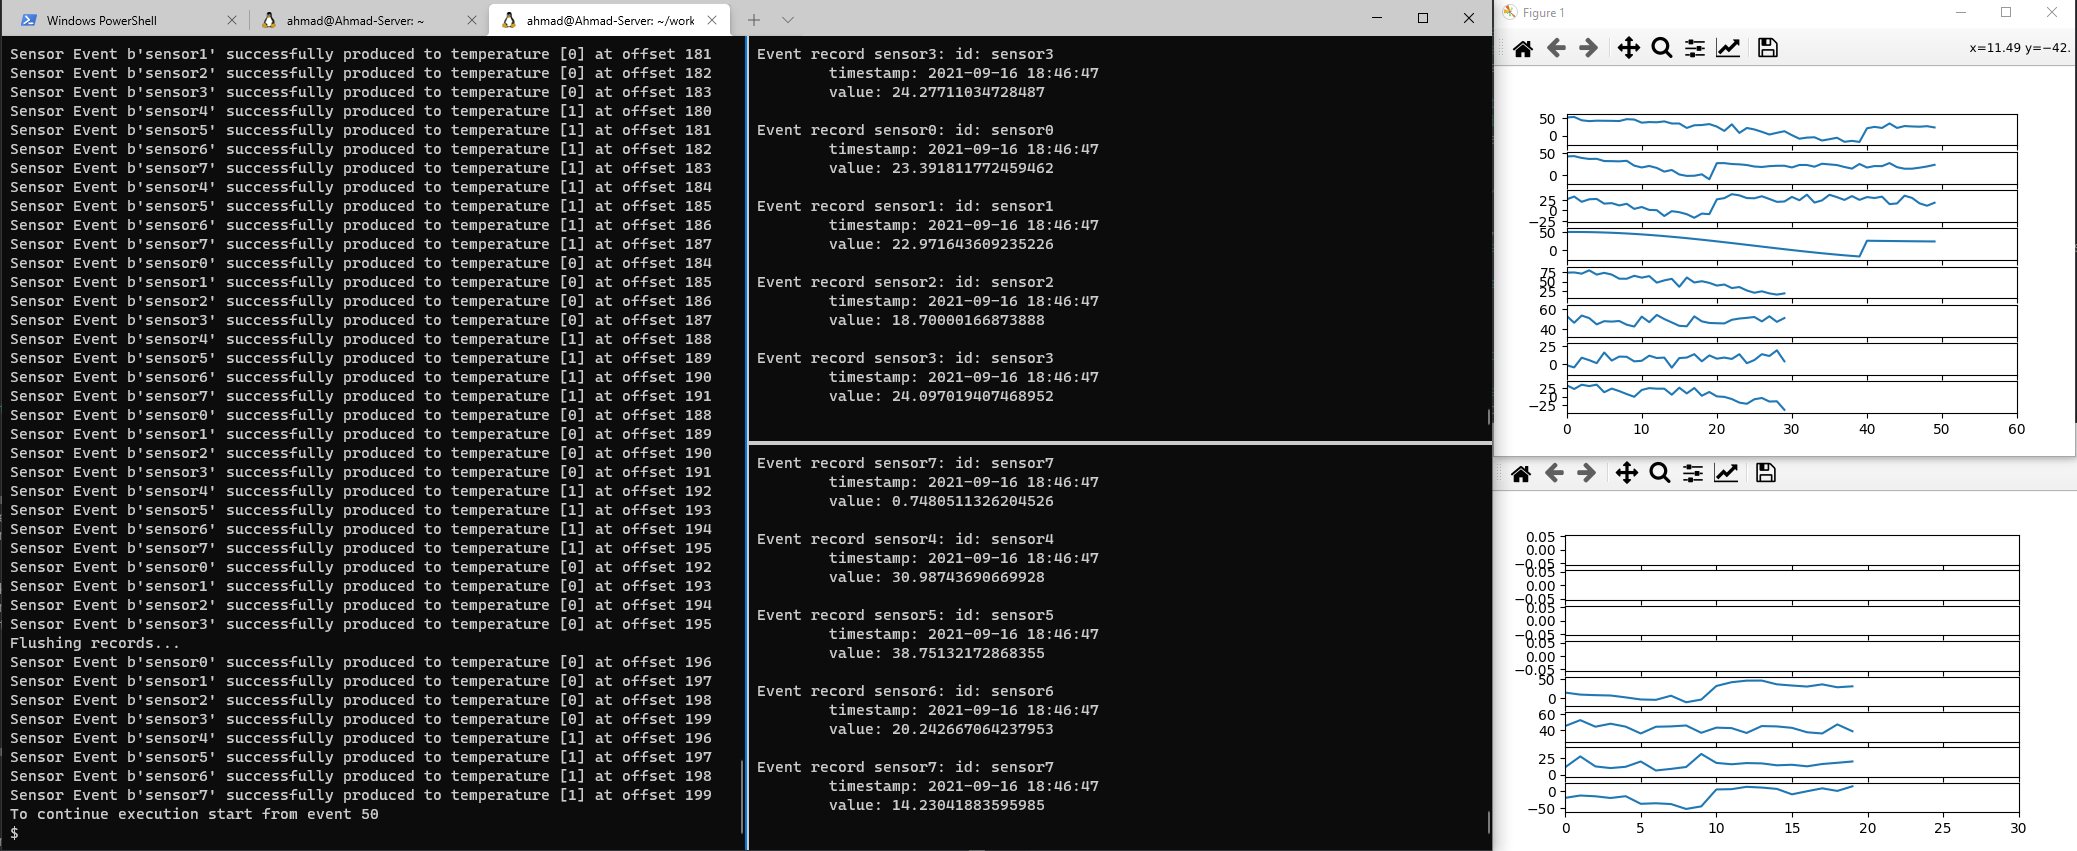
Now try creating another avro_consumer.py in another terminal leaving the previous one running.

$ python avro_consumer.py

Then produce 20 more events:

$ python avro_producer.py -e 20 -d 0.5 -t 30

Notice that now the produced events will be split between the two consumers, or to be more precise, the partitions will be split among the available consumers. Since we created two partitions, we can have a maximum of two consumers. The output should look similar to the image below.

Kafka example with two consumers

Note

Kafka remembers the events consumed by a consumer group. So if a consumer is interrupted and then restarted, it will continue from where it stopped. This is achieved through the consumer commit the offsets corresponding to the messages it has read. This can be configured to provide different delivery guarantees. The default is auto-commit that gives you at least once delivery guarantee. You can read more about this topic here.

Schema Registry Clients (Optional)

In some cases you might need to programmatically access the schema registry and retrieve the schema associated with a topic or by schema name. In this section we’ll show three different ways to do this. The source code for the examples is available at schema_examples.py.

To run this example you will need hops-util-py which is a helper library for HopsWorks that hides some of the configurations and initializations needed to access HopsWorks services. Install it with the following command.

$ pip install hops

The code starts by importing required libraries and loading the configuration file.

from hops import project
from hops import kafka
from hops import util, constants
from confluent_kafka import avro
from confluent_kafka.schema_registry import SchemaRegistryClient
import requests
import toml
import argparse

### Examples on how to interact with HopsWorks Schema Registry service
### externally from outside the HopsWorks cluster to query the schema


### Hops Configuration

# Parse arguments
parser = argparse.ArgumentParser(description='Examples using different methods to access'
                                 ' HopsWorks Schema Registry externally from outside the cluster.')
parser.add_argument("-c", "--config", default='config.toml',
                        help='Configuration file in toml format.')
args = parser.parse_args()
conf = toml.load(args.config)

The first example uses the HopsWorks REST API directly to query the schema registry. You need to construct a url for your query following the API documentation. In our case that is getTopicSubject. Then use a library, such as requests to send your query and retrieve the response. Note that you need to add your API Key to the request header.

### Get schema using HopsWorks REST API
### https://app.swaggerhub.com/apis-docs/logicalclocks/hopsworks-api/2.2.0#/Project%20Service/getTopicSubject

print('Example 1: Using HopsWorks REST API')
print('===================================')
print()

# Security header with the API Key
headers={'Authorization': 'ApiKey ' + conf['api']['key']}

# list all available schemas for your project
print('list all available schemas for your project')
url = 'https://' + conf['hops']['url'] + conf['api']['base'] + '/project/' + conf['project']['id'] + '/kafka/subjects'
print('url: ' + url)
response = requests.get(url, headers=headers, verify=conf['hops']['verify'])
print('schemas: ' + response.text)
print()

# get the schema associated with a topic using the topic name
print('get the schema associated with a topic using the topic name')
url = 'https://' + conf['hops']['url'] + conf['api']['base'] + '/project/' + conf['project']['id'] \
                 + '/kafka/topics/'  + conf['kafka']['topic'] + '/subjects'
print('url: ' + url)
response = requests.get(url, headers=headers, verify=conf['hops']['verify'])
schema = response.json()['schema']

print('schema for topic {} using HopsWorks REST API:'.format(conf['kafka']['topic']))
print(schema)
print()
Example 1: Using HopsWorks REST API
===================================

list all available schemas for your project
url: https://192.168.1.10/hopsworks-api/api/project/1143/kafka/subjects
schemas: [inferenceschema, sensor]

get the schema associated with a topic using the topic name
url: https://192.168.1.10/hopsworks-api/api/project/1143/kafka/topics/temperature/subjects
schema for topic temperature using HopsWorks REST API:
{"type":"record","name":"sensor","fields":[{"name":"timestamp","type":"long","logicalType":"timestamp-millis"},{"name":"id","type":"string"},{"name":"value","type":"double"}]}

The second example uses the handy hops-util-py library. All you need is to connect to your project using the project name, url, and API Key. Then use kafka.get_schema('topic_name')) to get the schema.

The third example uses the Confluent Schema Registry client. You will need to construct the url for the schema registry of your project then use it to initialize the schema registry client. You will also need to add the API Key to the header.

Now you can use the client to query the schema registry. In this example we use sc.get_latest_version('schema_name') to retrieve the schema.

### Get the schema using the Confluent Schema Registry client

print('Example 3: Using the Confluent Schema Registry client')
print('=====================================================')
print()

registry_url = 'https://' + conf['hops']['url']\
    + conf['api']['base'] + '/project/'+conf['project']['id']+'/kafka'
print('registry url: ' + registry_url)

sc = SchemaRegistryClient({'url': registry_url, 'ssl.ca.location': conf['hops']['verify']})

# Add the API key required by HopsWorks but not configurable through the confluent schema registry client
sc._rest_client.session.headers.update(headers)

# here we must use the schema name to look it up as confluent allows multiple schemas per topic
# see: https://docs.confluent.io/platform/current/schema-registry/serdes-develop/index.html#subject-name-strategy

print('get the schema using schema name')
schema = sc.get_latest_version(conf['kafka']['schema'])

print('id: {}'.format(schema.schema_id))
print('subject: {}'.format(schema.subject))
print('version: {}'.format(schema.version))
print('schema with confluent schema client:')
print(schema.schema.schema_str)
Example 3: Using the Confluent Schema Registry client
=====================================================

registry url: https://109.225.89.144/hopsworks-api/api/project/1143/kafka
get the schema using schema name
id: 1030
subject: sensor
version: 1
schema with confluent schema client:
{"type":"record","name":"sensor","fields":[{"name":"timestamp","type":"long","logicalType":"timestamp-millis"},{"name":"id","type":"string"},{"name":"value","type":"double"}]}

Simple Producer/Consumer (Optional)

For completeness we include the code for simple_producer.py and simple_consumer.py. By simple we mean that it doesn’t use Avro schemas and doesn’t validates schema. Kafka only sees blobs of bytes. It is up to you to keep track of what is stored in the topic and how to interpret the value.

# Load HopsWorks Kafka configuration
    conf = toml.load(args.config)

    # Initialize the Producer
    producer_conf = {'bootstrap.servers': conf['hops']['url']+':'+conf['kafka']['port'],
                     'security.protocol': 'SSL',
                     'ssl.ca.location': conf['project']['ca_file'],
                     'ssl.certificate.location': conf['project']['certificate_file'],
                     'ssl.key.location': conf['project']['key_file'],
                     'ssl.key.password': conf['project']['key_password']}
    p = Producer(producer_conf)


    for data in "Hello Kafka! I'm a simple client sending in some strings.".split():
        # Trigger any available delivery report callbacks from previous produce() calls
        p.poll(0)

        # Asynchronously produce a message, the delivery report callback
        # will be triggered from poll() above, or flush() below, when the message has
        # been successfully delivered or failed permanently.
        p.produce(conf['kafka']['topic'], data.encode('utf-8'), callback=delivery_report)

        # Wait for any outstanding messages to be delivered and delivery report
        # callbacks to be triggered.
    p.flush()


if __name__ == '__main__':
    main()
from confluent_kafka import Consumer
import toml
import argparse

def main():

    # Parse arguments
    parser = argparse.ArgumentParser(description='A simple Consumer example to consume strings'
                                     ' from a kafka topic hosted at a HopsWorks cluster.')
    parser.add_argument("-c", "--config", default='config.toml',
                        help='Configuration file in toml format.')
    args = parser.parse_args()

    # Load HopsWorks Kafka configuration
    conf = toml.load(args.config)

    # Initialize the Consumer
    consumer_conf = {'bootstrap.servers': conf['hops']['url']+':'+conf['kafka']['port'],
                     'security.protocol': 'SSL',
                     'ssl.ca.location': conf['project']['ca_file'],
                     'ssl.certificate.location': conf['project']['certificate_file'],
                     'ssl.key.location': conf['project']['key_file'],
                     'ssl.key.password': conf['project']['key_password'],
                     'group.id': conf['kafka']['consumer']['group_id'],
                     'auto.offset.reset': conf['kafka']['consumer']['auto_offset_reset'],
                     }

    consumer = Consumer(consumer_conf)

    # Subscribe to topics
    consumer.subscribe([conf['kafka']['topic']])

    while True:
        try:
            msg = consumer.poll(1.0)

            if msg is None:
                continue
            if msg.error():
                print("Consumer error: {}".format(msg.error()))
                continue

            print('Received message: {}'.format(msg.value().decode('utf-8')))
        except KeyboardInterrupt:
            break

    consumer.close()

if __name__ == '__main__':
    main()

Warning

Before running the simple_producer.py example make sure to create a new topic to avoid conflicts with the Avro examples. Also make a copy of your config.toml file and change the topic to match your new topic and use a different group_id than the one used in the Avro examples. When running the example use the -c flag to point to your new configuration file.

$ python simple_producer.py -c config2.toml
Message delivered to strings [0]
Message delivered to strings [1]
$ python simple_consumer.py -c config2.toml
Received message: Hello
Received message: Kafka!
Received message: I'm
Received message: a
Received message: simple
Received message: client
Received message: sending
Received message: in
Received message: some
Received message: strings.

Source Code

All source code is available at Kafka HopsWorks Examples at GitHub.

References

© Hopsworks 2024. All rights reserved. Various trademarks held by their respective owners.

Privacy Policy
Cookie Policy
Terms and Conditions