Optimize your MLOps Workflow with a Feature Store CI/CD and Github Actions
In this blog we present an end to end Git based workflow to test and deploy feature engineering, model training and inference pipelines.
At a high level each MLOps workflow can be broken down into 3 different pipelines: a feature engineering pipeline (or feature pipeline, for short), a training pipeline and an inference pipeline. The feature pipeline is responsible for computing the necessary features and saving them in the feature store to make them available for training or inference. The training pipeline is responsible for using those features, along with labels, to train a supervised machine learning (ML) model. Finally the inference pipeline is responsible for accepting prediction requests from clients, fetching pre-computed features to build one or more feature vectors, with which the model makes one or more predictions that are then used by the client to make intelligent decisions.
To successfully deploy and maintain a model in production it is paramount that the team has control and change management processes in place for both the data flow and the feature engineering, training and inference pipelines.
Hopsworks feature store provides a robust solution to manage the data flow, with several key capabilities, such as schema versioning, data commits, data validation, and alerting. Together, these give teams visibility over the data that is being used to compute features and lineage for the features used by models.
In this blog post, we will be discussing how you can pair Hopsworks with a SCM system like Git and a CI/CD platform like GitHub Actions. The combination of these three tools allow teams to have confidence in the assets produced by the feature and training pipelines: features and models, respectively. While this blog post focuses on the Git and GitHub Actions, it can be easily ported on other platforms such as BitBucket, GitLab, Jenkins and so on.
We are going to use the credit card fraud tutorial (also available as notebooks) to setup a CI/CD pipeline that validates, tests and deploys the Python programs that implement the feature engineering, model training, and inference pipelines.
At a high level, the flow of the tutorial is the following:
Setup
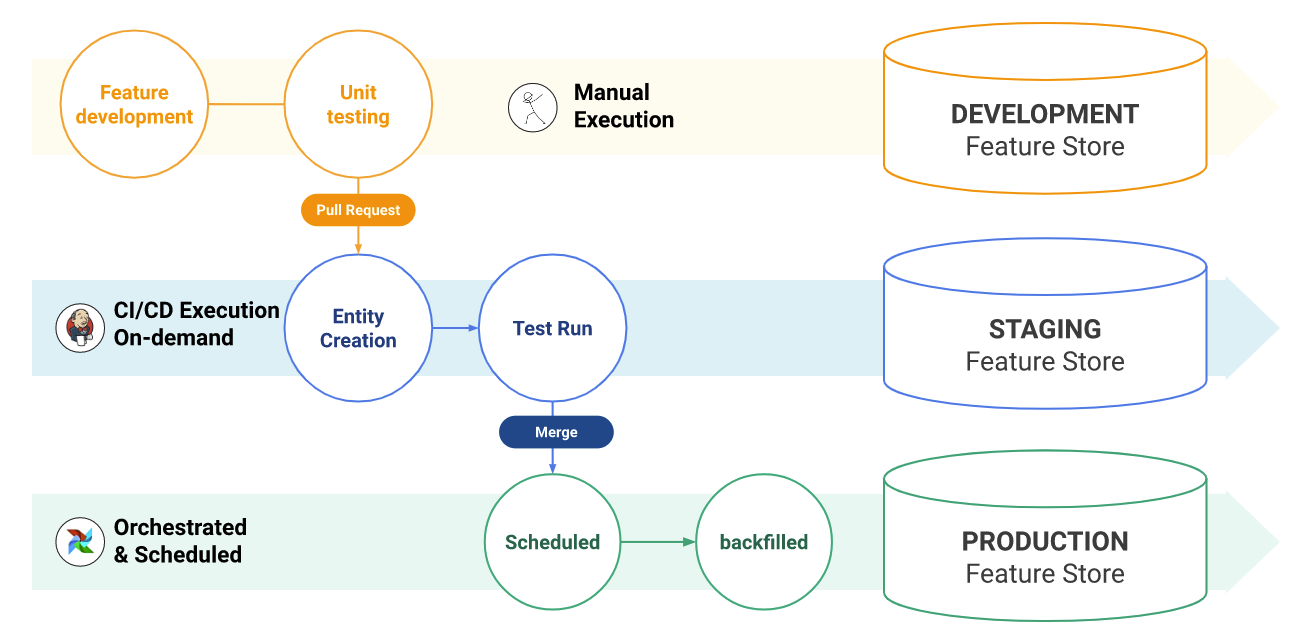
Before we begin there are a couple of setup steps we need to take to make sure the rest of the tutorial works as expected. In particular we need to set up the GitHub action secret for GitHub to be able to authenticate and interact with Hopsworks. We also need to configure the Git provider in Hopsworks for Hopsworks to be able to pull the code that needs to be executed.
Configuring the Git provider requires users to generate a GitHub token, and use it to configure the GitHub provider on Hopsworks.
For the GitHub Actions to authenticate with the feature store and perform the necessary operations, we need to generate an Hopsworks API Key which we are going to store as a secret in our GitHub project. This documentation guides you on how to generate an API key; it should be then set as an encrypted secret in the GitHub project.
Code Organization
The repository is organized as a Python package. Both the feature engineering code and the model code are hosted in the same repository. This is done primarily for demo purposes, In a real world deployment the same features might be used across multiple models and projects. This is a core capability of the Hopsworks feature store. Hence making each feature and feature pipeline not related to a specific model. It makes sense from a code organization standpoint to host the feature engineering code and the model code in separate repositories.
The repository has three main parts:
- Feature engineering code: The code that computes and stores the features in the feature store.
- Training pipeline code: The code that selects features, creates training data, and trains the model. This section also contains the code to deploy the model behind a REST endpoint to serve predictions to clients.
- Utility code: The set of utilities that are used to interact with Hopsworks and manage the lifecycle of the code deployment. They include utilities to configure and launch jobs, pull repository changes in Hopsworks and deploy the model.
Linter and Unit Testing
The first step to validate a PR is to validate that the code respects the style standards and to execute the unit tests. We use Pytest to write unit tests for the feature engineering code.
Unit tests allow for a quicker development cycle (as they can be executed locally) as well as to test for invariants, making sure that changes to the feature engineering logic are handled correctly by creating a new version of the feature group.
While this tutorial focuses on the workflow to get changes into production, we wrote a previous blog post that focuses on testing feature engineering and transformations with PyTest.
The GitHub Actions workflow above is executed every time a new pull request is opened. The first three steps of the workflow:
- (actions/checkout@v3) check out the code on the container running the GitHub Action
- (actions/setup-python@v4) set up the python environment
- (install deps) install the necessary Python dependencies.
Additionally, as the project is packaged as a Python package, we install the project itself using `pip install -e .`
After the setup steps, we execute black and flake8 to check for any code formatting or linting errors. If there are any errors, the action fails and the issues are reported in the GitHub pull request.
Automating the code formatting and linting checks, allows for more efficient code reviews, as the reviewer and the discussion is centered around the business logic and not around code styles. If the code looks good, then the pipeline executes the unit tests.
As the article linked above explains, unit tests don’t require any interaction with any systems. Unit tests are used to test individual functions with deterministic inputs and outputs. The results of the unit tests are then reported in the GitHub PR.
Integration Testing
Unit tests are not enough to validate a feature pipeline, though. Real world data is unpredictable and can break the pipeline in unexpected ways. Additionally running the code on test data can help identify performance issues that might impact production SLAs.
Running the feature engineering and model training code on a real cluster with some real data is the task of the second workflow in the repository:
The workflow uses a test project on the configured cluster. The workflow uses the Hopsworks Python library which can be configured using environment variables. At the top of the workflow we specify which cluster we want to use as testing environment, which project and the API key that the GitHub action should use to deploy and execute the code.
The first steps are similar to the unit test workflow, we checkout the code on the GitHub action and we prepare the Python environment. This time however, we only install the Hopsworks Python SDK, which will allow us to perform actions on the Hopsworks cluster.
To be able to run the code on Hopsworks we need to make it available on the platform. That’s the task of the pull changes step. It instructs Hopsworks to pull the PR changes inside the project.
The configure environment step is responsible for setting up the Python environment used by the pipelines to run. The Python environment is managed through the repository as well. The workflow installs the necessary dependencies from the requirements.txt. It also installs the wheel with the repository code.
The next steps of the GitHub workflow execute the feature engineering code and model training using Hopsworks jobs. Hopsworks jobs can be configured (e.g. amount of parallel executors, memory, cores and job specific dependencies). The job configuration is also tracked on the repository. Each pipeline has a JSON file containing the job configuration for that pipeline. This will make sure that changes to the job configuration can also be tracked, reviewed and tested before being deployed on production.
The workflow executes the jobs and polls for the execution status. When one execution finishes successfully, the next step of the pipeline is kicked off. If the execution fails, the pipeline also fails.
Production Deployment
Once the integration test pipeline has run successfully, the code can be deployed on the production project using this workflow:
There are two major differences between the workflow that runs the integration tests and the workflow that deploys the feature engineering code. In particular this workflow only deploys the code but doesn’t execute it, as well as, it does so on the production project not on the test project.
The rationale for only deploying the code and not executing it is that the feature pipelines and the model training job are executed on a regular basis. This is the case, for instance, if you are using a scheduler like Airflow that every night kicks off the necessary job to feature engineer the new data and train a new model on it.
What the deployment pipeline makes sure is that the feature pipelines run the latest code that has been merged on the main branch. As well as the latest job configurations are applied correctly to the Hopsworks jobs.
Model deployment
The model in the tutorial is a sklearn model. To be deployed behind a REST API on KServe, we need to provide a custom predictor script. A predictor script is a Python script that is responsible for loading the model into memory and to handle incoming prediction requests. As for the rest of the code, the predictor script is also checked in our git repository.
We do not want to deploy a new model as soon as it’s trained as we need to validate the model before deploying it in production. We should, however, automate the steps that are required to deploy the model. This is done in the deploy-model workflow:
This workflow is different from the previous ones as it’s executed only when triggered by the data scientist. They provide which model and version they want to deploy and the workflow will deploy the version using the latest predictor committed on the main branch.
As for the feature engineering code, the predictor code also needs to be pulled by Hopsworks before it can be deployed on KServe. This is the reason that one of the first steps of the workflow is to execute a pull operation on the repository on Hopsworks.
Conclusion
In this blog post we created an end to end Git based workflow to test and deploy feature engineering, model training and inference pipelines. By using the workflow (check out the full Github actions with Hopsworks example), you can track, review, and validate changes to the pipelines, as well as automate their deployment.