Testing feature logic, transformations, and feature pipelines with pytest
Operational machine learning requires the offline and online testing of both features and models. In this article, we show you how to design, build, and run test for features.

The source code for the examples in this article are available here on github.
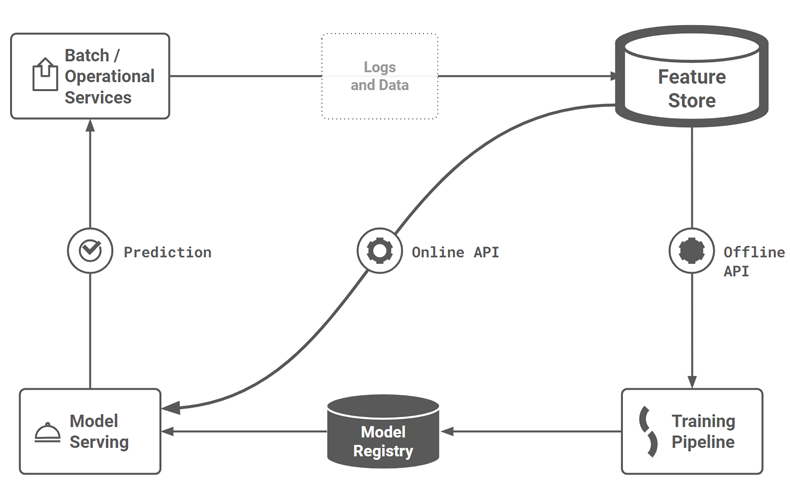
Figure 0. Where and how do we test the pipelines in this MLOps architecture?
Introduction
In 2020 in our MLOps with a Feature Store article, we wrote that “i_f AI is to become embedded in the DNA of Enterprise computing systems, Enterprises must first re-align their machine learning (ML) development processes to include data engineers, data scientists and ML engineers in a single automated development, integration, testing, and deployment pipeline.“_ Since then, MLOps has become a widely adopted marketing term for ML platforms, but as a development and operational process, MLOps has many gaps that need filling.
We passionately believe the automated testing of feature pipelines and training pipelines are must-haves for operationalizing machine learning using Enterprise data. We also believe that Python has a huge role to play in feature engineering (not just model training), not least because it's the language of choice of data science, but also because feature engineering with tabular data is more than just computing aggregations with SQL.
Data still needs to be transformed into an appropriate numerical format, and embeddings are becoming an increasingly popular way to compress high dimensional data into powerful features - both things that Python excels at. To this end, we fill in part of the MLOps lifecycle with guidelines and examples of how you can test your feature logic and your feature pipelines with pytest [1]. Figure 1 shows (in green) the phase in the MLOPs lifecycle covered in this article - offline feature testing.
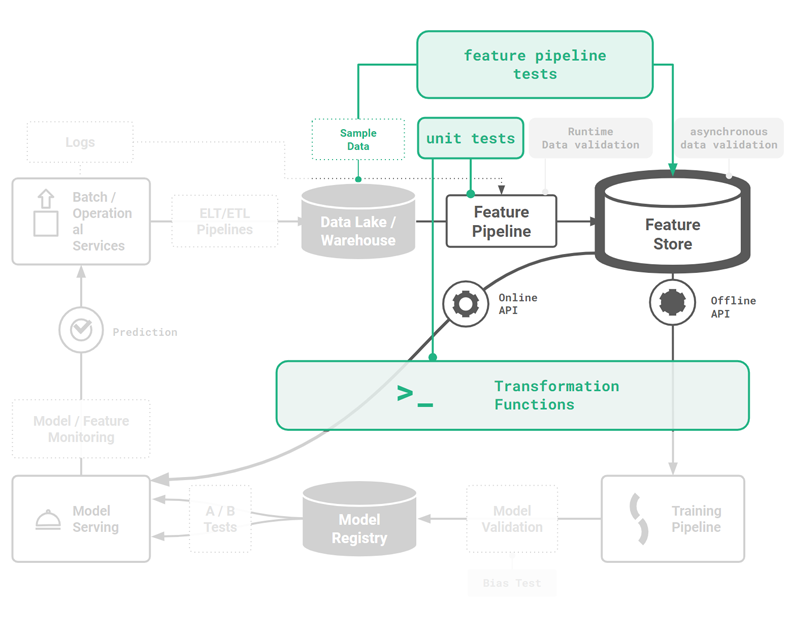
Figure 1. Feature pipelines are a key stage in the MLOps lifecycle and can be tested with a combination of unit tests for feature logic (pytest), end-to-end feature pipeline tests (pytest), and data expectation tests (great expectations).
Unit Tests for feature logic
Unit tests for feature engineering validate that the code that computes your feature correctly implements the specification defined by the unit test itself. Unit tests are defined on functions. For feature engineering, this means that if you want to unit test a feature, you should factor your code so that the feature is computed by a single function. The unit test should be designed to guarantee invariants, preconditions and postconditions for the feature logic you wrote.
With your unit tests in place, if somebody changes the implementation of the feature logic and it violates the feature specification, your unit test should detect the broken implementation of the feature logic with a failed assertion. This should help you catch errors before they affect downstream users of your features - the data scientists using the feature to create training data and the ML engineer using the feature to build feature vectors for online (operational) models.
Refactor your features into functions
One challenge for many data scientists who want to start writing unit tests is that much of their code is written in notebooks. From a software engineering perspective, there is nothing inherently wrong with writing feature engineering code in notebooks, despite some vocal criticism (as in the "I don't like notebooks" talk during Jupyteron 2018). Two objections frequently used against notebooks - integration with source code control and scheduled execution - now have good solutions. For example, nbdime (available as a plugin in Jupyter) can be used to view the differences between two versions of a notebook and frameworks like Papermill and our own Hopsworks support the scheduled execution of notebooks as jobs.
However, better tooling for notebooks will not help you unit test features inside them if you do not structure your code such that your feature engineering logic is encapsulated in a function that is independently testable.
For example, in the snippet below, we can see a function col_sum that creates a new feature by summing two input columns a and b together:
Here, the feature engineering logic is encapsulated inside a function. You are able to test that function in isolation, with a unit test. If you want to add a new feature to your feature engineering pipeline, you can simply add another function such as this one. The above function also includes type annotations. Python is a dynamically typed language, and the type annotations in the snippet above help you catch bugs earlier, by returning a runtime error if you pass in a value with a type that does not match the annotated type hint. For example, if you pass a parameter of a type different from pd.Series to the col_sum(), you will get an error. Explicit types will help you catch bugs earlier, and you should use them for your feature engineering functions.
pytest
Pytest is a unit testing framework for Python that is mainly used for writing tests for APIs. Here, we will show how you can use pytest to write (1) unit tests for feature engineering code computed by a single function, and (2) end-to-end feature pipelines that write computed features to a feature store. You can install pytest as follows:
Pytest is built on 3 main concepts: test functions, assertions, and test setup. In pytest, unit tests may be written either as functions or as methods in classes. Pytest has a naming convention to automatically discover test modules/classes/functions. A test class must be named “Test*”, and test functions or methods must be named “test_*”.
In figure 2, we can see that pytest is run during development as offline tests, not when feature pipelines have been deployed to production (online tests).
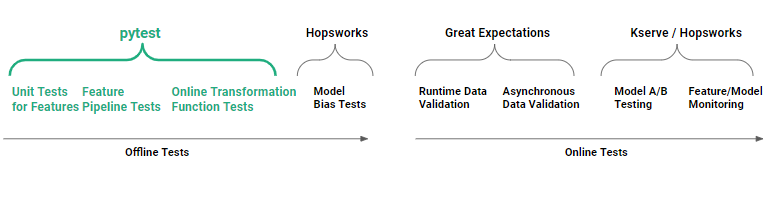
Figure 2. Pytest can be used to execute offline feature engineering tests: to unit test feature logic, to unit test transformation functions, and to test feature pipelines end-to-end (integration tests).
Python directory structure
It is typically a good idea to store your tests in separate files in a dedicated directory outside of your actual feature engineering code, as this separates the code for feature engineering from the code for testing. The following directory structure is a popular way to organize your feature engineering code and your tests, with your feature engineering in the features directory and your unit tests in the test_features directory:
If you use the above directory structure, but you don’t have a setup.py file (and you depend on default Python behavior of putting the current directory in sys.path), to run your unit tests, you will need to run the following from the root directory:
A testing methodology
You should start with a methodology for structuring test cases, such as the arrange, act, assert pattern that arranges the inputs and targets, acts on the target behavior, and asserts expected outcomes. This is the structure we use in the examples in this article.
However, how do you know what to test and how to test it? Testing is not always required for all features. If the feature is a revenue driver at your company, then you probably should test it thoroughly, but if your feature is experimental, then maybe it requires minimal or no testing.
That said, our preferred testing methodology for features is a simple recipe:
- test common code paths with end-to-end tests;
- write unit tests for the untested code paths (check your test code coverage).
This methodology will help get you started, but it is not a panacea. For example, imagine you wrote a feature to compute monthly aggregations, but you forgot to include code handling the leap year. With the methodology, you would not see that the leap year code path was not covered in test code coverage. Only when you first discover the bug, will you fix it, and then you should write a unit test to ensure that you don’t have a regression where the leap year bug appears again. What will help is testing with more edge cases in your input data and anticipating edge cases.
Although there are different schools of thought regarding test-driven development, we do not think that test-first development is productive when you are experimenting. A good way to start is to list out what you want to test. Then decide if you want to test offline (using pytest) or at runtime (with data validation checks, such as Great Expectations). If you have a choice between offline and online tests, offline tests are generally preferred as problems can be identified during development and offline tests do not add runtime overhead.
Unit tests for features
In this example, our web application generates logs with the IP address of visitors, and we want to add additional features to help make predictions about our website visitor. The IP address is logged as an int (4 bytes) to save on storage space. Our data scientist wants to transform that IP address into the city where our visitor came from, as she believes it will have predictive value for her model.
This code snippet defines functions to convert an IP address as a 32-bit number into a stringified representation (with dot notation - e.g., 192.168.0.1). There is also a function to convert the stringified IP address into an int representation for the IP address. Finally, there is an ip_str_to_city() function that transforms the stringified IP address into a categorical variable - the city that the IP address is located in.
Here is our unit test for the above ip_str_to_city() feature. It defines four test IP addresses as strings, the four integer representation of those IP addresses, and the four cities for those IP addresses according to the DbIpCity API.
The above three tests perform the following checks. The first test checks that the IP addresses are correctly transformed into ints. The second test checks that the int representation of the IP addresses are correctly transformed back into stringified IP addresses. Finally, the last test validates that the stringified IP addresses are correctly mapped to the city name in the cities array (generated by the DbIpCity API).
In pytest, an assertion checks if some state is True or False. If an assertion fails in a test method, then execution stops and the test fails without executing any more code in the test method. Pytest will, then, move on to execute the next test method and run its assertions.
You can then run your tests from the root directory as follows:
A breaking change is made to the feature logic
The above code works fine when using the ip_str_to_city function in our feature logging system that processes the web logs as they arrive. There is a relatively low number of lookups. However, when traffic increases on our website, we notice that our call to DbIpCity.get(ip, api_key='free') gets rate-limited - we are calling a network service. We also notice that we can’t backfill features from our weblogs in the data lake for the same reason. So, we decide to use an embedded database to map the IP address to the city name. Maxmind provides such a database (both for free and commercial use). We keep our API the same, just change the implementation.
What could go wrong?
The cardinality of our ip_str_to_city categorical feature changed. What happened is that the resolution of the maxmind database is not as high as the network service by DbIpCity. When our unit test runs, it maps the first IP address to ‘Stockholm’ instead of ‘Stockholm (Södermalm)’. The number of categories in our new implementation is smaller than in the original DBCity version. The distribution of our categorical variable changes, which means we shouldn’t mix the new feature implementation with training data created with the older feature implementation. In fact, our embedded database has a subset of the categories of our original DbIpCity service, so if we picked different IP addresses to test with, the tests may have passed. Additional data validation tests may have identified the changes in the data distribution (but only at runtime), but as the new implementation didn’t introduce any new categories, the bug is not easily identified.
Hopsworks also supports transformation functions that, similar to our feature functions, are also Python functions. Transformation functions can also be tested with unit tests.
Unit test for a transformation function
If your feature store stores your city names as a string (which is good for exploratory data analysis), you will still need to transform that string into a numerical format when you want to (1) train a model and (2) predict with the model (inference). A potential source of error here is when you have separate systems for model training and model inference. With two different systems, it may happen that you unwittingly have a different implementation of the (city-name to int) transformation function, as both systems are written in different programming languages or have different code bases. This problem is known as training-serving skew.
Transformation functions prevent training-serving skew by providing a single piece of code to transform an input feature value into an output format used by the model for training and serving.
For our city name, we can use the built-in LabelEncoder transformation functions to replace the categorical value (the city name) with a numeric value between 0 and the number of classes minus 1.
However, let’s assume we also want to use the click_time datetime column, from our sample-click-logs.csv file, as a feature. We need to encode it in a numerical format.
In the code snippet below, we have a transformation function that converts a string in US date-format into a numerical timestamp. The unit test here can help guard against any unplanned changes in the feature implementation, such as switching dates from US-format to ISO-format dates.
The unit test for our date transformation function looks as follows:
As you can see, our unit test for our transformation function is the same as our earlier unit test, with the exception of using the @pytest.mark.parametrize annotation to supply the test cases.
There is another case where we can use unit tests in our feature pipelines - as utility python functions, as we show here with functions for enforcing feature naming conventions.
Unit test for feature naming conventions
Assume that you want uniformity in your feature naming, so that different teams can quickly understand the feature being computed and its origin. Downstream clients soon come to programmatically depend on the naming convention for features, so any changes in your naming convention could break downstream clients. It is possible to perform a runtime check that the name follows the correct format but in an orchestrated feature pipeline, it makes more sense to enforce correct feature names statically with functions. Then, your naming convention can be validated with unit tests, so that any unplanned changes to the naming convention are detected during development.
In the code snippet below, we provide two functions for defining (1) feature group names and (2) feature names.
This is a unit test to ensure that any changes to feature group or feature naming conventions are identified when pytest is run.
The unit test for our feature name is almost identical to the above code, and is omitted for brevity.
Now, we have looked at pytest for unit tests, let us look at pytest to run integration or end-to-end tests for feature pipelines.
Pytest for feature pipelines
A feature pipeline is a program that can be run on a schedule or continuously that reads new input data from some data source, computes features using that input data, and writes the features to the feature store. A more technical description of a feature pipeline is that it is a program that reads data from one or more data sources, and then orchestrates the execution of a dataflow graph of feature engineering steps for the input data, including data validation, aggregation, and transformations. Finally, it writes the engineered features (the output DataFrame (Pandas or Spark)) to a feature group.
We can test feature pipelines, end-to-end, with pytest. A feature pipeline test validates that your pipeline works correctly end-to-end - that it correctly plugs together different steps, such as, reading and processing data, feature engineering, and writes the features to the feature store. A simple feature pipeline test reads some sample data, engineers features, writes to the feature store, and then validates that the data it reads from the feature store is the same as the data written, and that the number of rows written was as expected.
Feature pipeline tests are slower to run compared to unit tests, because they need to connect to services and process some sample data. They also require data and infrastructure. You will need some sample data and a “dev” (development) feature store. In Hopsworks, you can create a new private project for each developer, where each project has the developer’s own private feature store. In this example, we include some click log sample data (sample-clicks.csv). You may need to subsample and even anonymize production data to create the sample data for your pipeline. The sample data should be representative of the production data for your pipeline.
Our feature pipeline here writes the feature we computed earlier (ip address and city name):
Here, we write a simple end-to-end test that performs a row count validation on the features written. The feature pipeline reads sample data into a Pandas DataFrame, computes some features in the DataFrame, writes the DataFrame to a feature group to the feature store, and then reads the data back from the feature store as a DataFrame, validating that the number of rows in the original DataFrame is equal to the number of rows in the DataFrame read back from the feature store. We can perform this test on both the offline feature store and the online feature store, as rows may be written to both stores. In this example, we only validate the number of rows written to the online store:
You can see the init_fs function is run first to set up the tests by first deleting the clicks feature group if it exists, then creating it, then reading up the sample data into a Pandas DataFrame. Then the tests are run against the feature group and the DataFrame.
Pytest for Jupyter notebooks
You can also use pytest to test your feature engineering code in your Jupyter notebook provided that you (1) refactor your feature engineering code into functions, and (2) convert your notebook to python file before running pytest. Luckily, nbmake enables you to easily convert your notebook into a Python file, enabling you to run pytest:
In our github code repository, we have a Jupyter notebook with the same feature engineering source code as earlier for converting IP addresses between string/int format and for mapping an IP address to its source city name. The same notebook also contains the feature pipeline code, so that all code needed for the pipeline is in a single file. Here, we show the pytest program (written in Python) to test our notebook:
The code first converts the notebook into a python file using nbconvert, then it executes the Python program, asserting False if there was an error when running the notebook. It is also possible to run the tests from within your Jupyter notebook, by uncommenting and running the cell with:
Some other good tips for testing notebooks are to add:
- pytest-xdist to speed up pytest with notebooks, as you can run tests in parallel on many workers (CPUs) on your server.
- use nbstripout to clean notebook output data - do this before committing your notebooks to your source code versioning system;
- use ReviewNB to review notebooks in pull requests.
Summary
In this article we introduced how pytest can be used to execute unit tests for feature logic, unit tests for transformation functions, and end-to-end tests for feature pipelines. In upcoming articles, we will discuss how to move from development to staging to production environments with continuous integration tests in the different environments and also how to use Great Expectations to add runtime data validation to feature pipelines.